Indulge in the creamy, dreamy goodness of a classic New York-style cheesecake. This Creamy Classic Cheesecake recipe is more than just a dessert; it’s an experience. From its buttery graham cracker crust to its incredibly smooth and rich filling, this cheesecake is a testament to simple baking done right. This comprehensive guide will walk you through every step, ensuring you achieve a flawlessly baked cheesecake that will impress your family and friends. Whether you’re a seasoned baker or a kitchen novice, this recipe is designed for success. Get ready to embark on a culinary journey that will leave you craving more!
Why You’ll Love This Creamy Classic Cheesecake Recipe
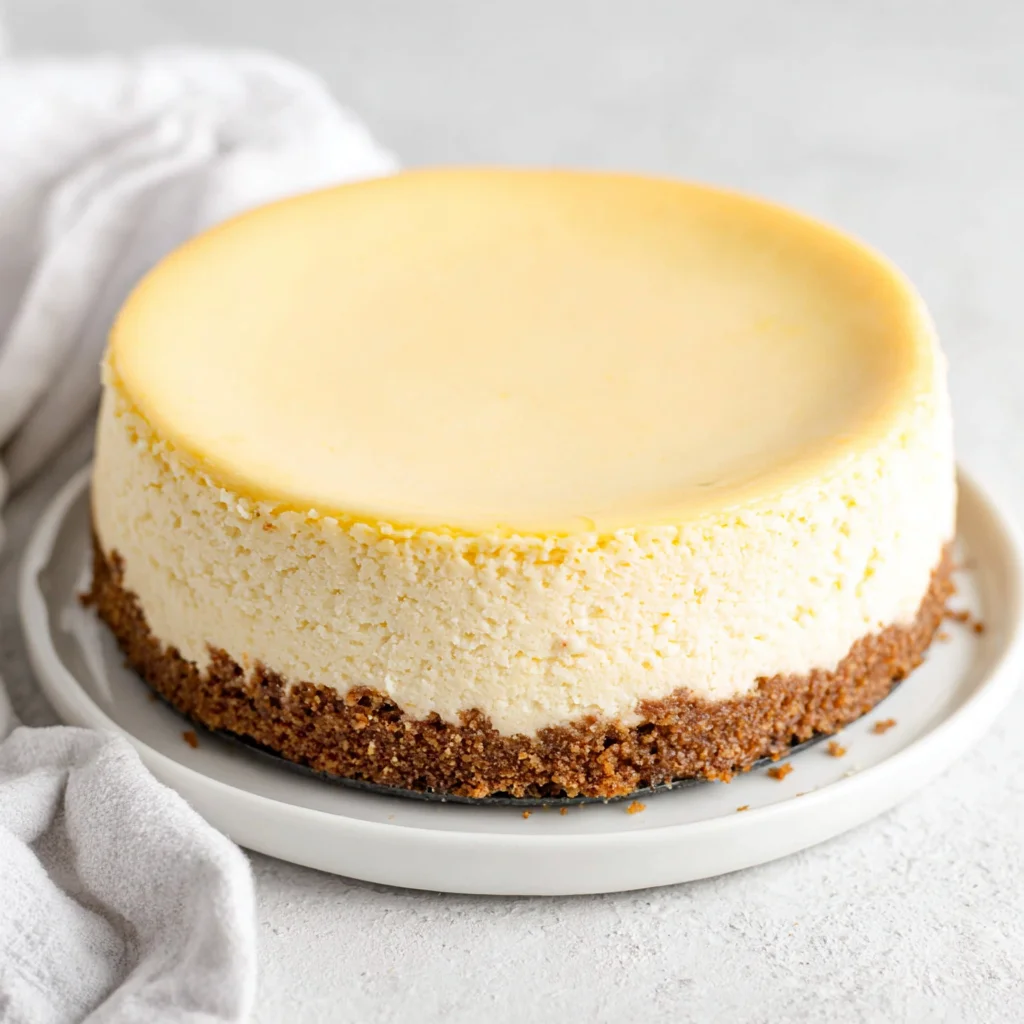
This Creamy Classic Cheesecake recipe is a true crowd-pleaser, offering an irresistible combination of textures and flavors. The delicately crisp graham cracker crust provides a delightful contrast to the luxuriously creamy filling. The tanginess of the cream cheese is perfectly balanced by the sweetness of the sugar, resulting in a harmonious flavor profile that is both satisfying and refined. But it’s not just about the taste; it’s about the experience.
Imagine the pride you’ll feel as you present this stunning dessert, its smooth, creamy surface glistening under the light. The rich aroma filling your kitchen will tantalize everyone’s senses. The first bite will transport you to a world of pure indulgence – a world where creamy, tangy cream cheese melts in your mouth, perfectly complemented by the subtle crunch of the graham cracker crust. It’s the kind of dessert that sparks conversations and creates lasting memories. This isn’t just a recipe; it’s a celebration of deliciousness, a testament to the simple joy of baking, and a guaranteed way to impress your guests. This Creamy Classic Cheesecake is the perfect dessert for birthdays, holidays, or any special occasion – or simply because you deserve a decadent treat. And don’t forget, it’s even better the next day! Check out our other delicious recipes, like our delicious berenjenas con miel for a savory counterpoint.
Why You Should Try This Creamy Classic Cheesecake Recipe
Beyond its undeniable deliciousness, this Creamy Classic Cheesecake recipe offers a plethora of reasons to give it a try. Firstly, it’s surprisingly easy to make, even for beginner bakers. The step-by-step instructions are clear and concise, guiding you through each stage with confidence-boosting tips and tricks. Secondly, the recipe uses readily available ingredients, eliminating the need for specialized or hard-to-find items. This makes it a practical choice for any occasion, ensuring a stress-free baking experience. The recipe is also incredibly versatile. You can easily customize it to your liking, adding various toppings such as fresh berries, chocolate shavings, or a caramel drizzle. It’s an excellent canvas for creativity, allowing you to personalize the dessert and make it your own. And let’s not forget the impressive factor! This Creamy Classic Cheesecake is a showstopper. Its elegant appearance and rich flavor are sure to garner compliments from everyone who takes a bite. It’s a dessert that will not only satisfy your taste buds but also impress your guests. Start your culinary journey with this delightful recipe, and you’ll discover that baking a masterpiece can be simpler and more rewarding than you ever imagined.
Ingredients and Necessary Utensils for a Perfect Creamy Classic Cheesecake
Gathering the right ingredients and tools is crucial for baking a flawless Creamy Classic Cheesecake. The quality of your ingredients directly impacts the final taste and texture, so don’t compromise on quality. Using the correct tools will also simplify the process and improve the overall outcome. Let’s delve into the specifics:
Ingredients:
- For the Crust:
- 1 ½ cups (150g) graham cracker crumbs: Choose high-quality graham crackers for a richer, more flavorful crust. You can also pulse them in a food processor for a finer texture.
- ¼ cup (50g) granulated sugar: This adds sweetness and balances the slightly tart flavor of the cream cheese.
- 6 tablespoons (85g) unsalted butter, melted: Use unsalted butter for better flavor control. Make sure the butter is completely melted to ensure even distribution in the crust.
- For the Filling:
- 3 (8 ounce) packages cream cheese, softened to room temperature: Softened cream cheese is essential for a smooth and creamy filling. Let it sit at room temperature for at least 30 minutes before starting.
- 1 ¾ cups (350g) granulated sugar: The sugar adds sweetness and helps to create the signature smooth texture. Use granulated sugar for best results.
- ¼ cup (60ml) sour cream: Sour cream adds a delightful tanginess and moisture to the filling. Use full-fat sour cream for a richer flavor.
- 2 teaspoons vanilla extract: A touch of vanilla extract enhances the overall flavor profile. Use pure vanilla extract for the best results.
- ¼ teaspoon salt: A pinch of salt helps to balance the sweetness and bring out the other flavors. Don’t skip this essential ingredient!
- 4 large eggs: The eggs bind the ingredients and contribute to the cheesecake’s texture. Make sure your eggs are at room temperature to prevent cracking during baking.
Necessary Utensils:
- 9-inch springform pan: This type of pan is essential for easily releasing the cheesecake after baking. Make sure your springform pan is in good condition and doesn’t leak.
- Medium bowl: For mixing the crust ingredients.
- Large bowl: For mixing the filling ingredients.
- Electric mixer: An electric mixer is highly recommended for achieving a smooth and creamy filling. A hand mixer will also work, but it may take a little more effort.
- Rubber spatula or wooden spoon: For scraping down the sides of the bowl and ensuring all ingredients are thoroughly combined.
- Measuring cups and spoons: For accurate ingredient measurements.
- 9×13 inch baking pan or roasting pan: For creating a water bath.
- Wire rack: For cooling the cheesecake completely after baking.
- Parchment paper (optional): For lining the bottom of the springform pan to prevent sticking.
- Thin knife or offset spatula: For releasing the cheesecake from the pan.
Detailed Recipe Steps for a Creamy Classic Cheesecake
Now, let’s get into the baking process. Follow these steps meticulously, and you’ll be rewarded with a creamy, dreamy cheesecake that will make you the star baker.
Step 1: Preparing the Crust
- Preheat your oven to 350°F (175°C). This ensures that your crust bakes evenly and doesn’t become soggy.
- In a medium bowl, combine the graham cracker crumbs, sugar, and melted butter. Mix thoroughly until all the crumbs are evenly moistened. **Don’t overmix** as this can make the crust tough.
- Press the mixture firmly into the bottom of your 9-inch springform pan. Use the bottom of a measuring cup or your fingers to create an even layer. **Make sure the crust is evenly distributed** to prevent uneven baking.
- Bake for 8-10 minutes, or until the crust is lightly golden brown. Keep a close eye on it to avoid burning.
- Remove the pan from the oven and let the crust cool completely on a wire rack before proceeding to the next step. This prevents the filling from melting the crust.
Step 2: Making the Filling
- In a large bowl, beat the softened cream cheese and sugar with an electric mixer until the mixture is completely smooth and creamy. **Make sure the cream cheese is at room temperature** for optimal results.
- Beat in the sour cream, vanilla extract, and salt. Mix until everything is well incorporated.
Step 3: Adding the Eggs
- Add the eggs one at a time, beating well after each addition. **Be sure to scrape down the sides of the bowl** to ensure everything is evenly mixed. **Do not overmix** as this can introduce too much air into the batter, leading to cracks during baking.
Step 4: Baking the Cheesecake
- Pour the filling over the cooled crust. Spread it evenly to ensure even baking.
- Place the springform pan in a larger roasting pan or baking pan. This will create a water bath, which helps to prevent cracking and ensures even cooking.
- Pour enough boiling water into the roasting pan to come halfway up the sides of the springform pan. **Be careful when handling boiling water.**
- Bake for 50-70 minutes, or until the cheesecake is set around the edges but the center still jiggles slightly when you gently shake the pan. **Do not overbake**, as this will result in a dry cheesecake. The center will continue to set as it cools.
Step 5: Cooling and Chilling
- Turn off the oven and leave the cheesecake in the oven with the door slightly ajar for 1 hour. This allows it to cool gradually, preventing cracking.
- Remove the cheesecake from the water bath and let it cool completely on a wire rack. This is crucial for preventing condensation.
- Once cooled, cover the cheesecake and refrigerate for at least 4 hours, or preferably overnight, before serving. This allows the flavors to meld and the cheesecake to set completely.
Step 6: Serving
- Before serving, carefully run a thin knife or offset spatula around the edges of the cheesecake to loosen it from the pan. This will help to prevent breaking.
- Release the springform pan and serve chilled. Garnish as desired.
Tips and Variations for Your Creamy Classic Cheesecake
This Creamy Classic Cheesecake recipe is wonderfully adaptable. Here are some tips and variations to make it your own:
- Crust Variations: Experiment with different crusts, such as a chocolate cookie crust, a pecan sandie crust, or even a gluten-free crust made from almond flour.
- Filling Variations: Add a swirl of raspberry or strawberry jam to the filling for a burst of fruity flavor. Consider using different types of cream cheese or adding a layer of fruit preserves.
- Toppings: Get creative with toppings! Fresh berries, chocolate shavings, whipped cream, a caramel sauce, or even a sprinkle of cinnamon are all delicious options.
- Avoiding Cracks: To minimize cracks, ensure your cream cheese is softened to room temperature, don’t overmix the batter, and use a water bath while baking. Let it cool gradually in the oven after baking.
- Storage: Store leftover cheesecake in the refrigerator, covered tightly, for up to 5 days. It tastes even better the next day!
- Vegan/Gluten-Free Options: For a vegan version, use a vegan cream cheese alternative and a gluten-free graham cracker crust. For a gluten-free version, opt for a gluten-free graham cracker crust.
Nutritional Values and Benefits of This Creamy Classic Cheesecake
While indulging in this Creamy Classic Cheesecake, it’s helpful to understand its nutritional profile and the benefits of its ingredients. This information is approximate and may vary based on the specific ingredients used.
A serving of Creamy Classic Cheesecake (approximately 1/12 of the whole cake) typically contains around 400-500 calories, with a significant portion coming from fat and sugar. The protein content is moderate, while carbohydrates are primarily derived from the sugar and crust. The nutritional information provided is an estimate and can vary based on the specific brands and quantities of ingredients used.
However, let’s not overlook the positive aspects. Cream cheese is a source of calcium, which is essential for strong bones. Graham crackers provide some fiber, though the quantity is relatively low. The eggs contribute to protein intake. Ultimately, this Creamy Classic Cheesecake should be enjoyed in moderation, as part of a balanced diet. It’s a treat to savor, not a daily staple. For a healthier balance, explore some of our savory recipes, such as our delicious paella mixta.
FAQs about Creamy Classic Cheesecake
How do I prevent my Creamy Classic Cheesecake from cracking?
How long does Creamy Classic Cheesecake need to chill?
Can I make this Creamy Classic Cheesecake ahead of time?
What kind of cream cheese should I use for Creamy Classic Cheesecake?
Is it possible to freeze Creamy Classic Cheesecake?
Conclusion: Your Journey to Creamy Classic Cheesecake Perfection
Baking this Creamy Classic Cheesecake is a rewarding experience, resulting in a dessert that is both visually stunning and incredibly delicious. Remember the key steps: prepare a perfectly crisp crust, create a luxuriously smooth filling, and bake it gently to achieve the perfect texture. Chilling is essential for a firm and flavorful cheesecake. By following this recipe and incorporating the tips and variations, you’ll be well on your way to baking a Creamy Classic Cheesecake that will be the star of any gathering. We hope you enjoyed this comprehensive guide! Now, it’s your turn to create a culinary masterpiece. Share your Creamy Classic Cheesecake creations with us in the comments below! Don’t forget to share this recipe with your friends and family, and check out our other delicious recipes on our blog Noeli’s Recipes. Happy baking!
Creamy Classic Cheesecake
Ingredients
Equipment
Method
- Preheat oven to 350°F (175°C). Combine graham cracker crumbs, sugar, and melted butter in a bowl. Press into the bottom of a 9-inch springform pan.
- Bake for 8-10 minutes, or until lightly golden. Cool completely.
- Beat cream cheese and sugar until smooth. Beat in sour cream, vanilla, and salt.
- Add eggs one at a time, beating well after each addition. Do not overmix.
- Pour filling over the cooled crust. Place the springform pan in a larger roasting pan. Pour boiling water halfway up the sides of the springform pan.
- Bake for 50-70 minutes, or until the edges are set but the center still jiggles slightly.
- Turn off the oven; leave cheesecake in the oven with the door slightly ajar for 1 hour. Cool completely, then refrigerate for at least 4 hours, or preferably overnight.
- Run a knife around the edges before releasing the springform. Serve chilled.


