Welcome to the ultimate guide for creating the most unforgettable party appetizer: the Jalapeño Popper Cheese Ball. This recipe takes everything you adore about the classic deep-fried jalapeño popper the fiery crunch, the smoky bacon, and the rich, creamy cheese and transforms it into an elegant, easy-to-serve centerpiece that requires absolutely no frying. If you’re searching for a simple, make-ahead appetizer that steals the show at every gathering, holiday party, or game day event, look no further. This massive, flavor-packed cheese ball is guaranteed to be the first thing to disappear off the platter, offering a perfect blend of texture and heat that keeps everyone coming back for more. We’ve meticulously crafted this recipe to ensure maximum flavor infusion and structural integrity, resulting in a show-stopping dish that is truly copy-paste ready for your next event.
The beauty of this Jalapeño Popper Cheese Ball lies in its simplicity and versatility. Unlike traditional poppers that demand deep-frying and constant attention, this recipe is almost entirely hands-off once the initial mixing is complete. The crucial chilling time allows the incredible blend of softened cream cheese, sharp Monterey Jack, fresh minced jalapeños, and smoky bacon to meld into a harmonious, irresistible flavor bomb. When it’s time to serve, a final roll in a crunchy coating of Panko breadcrumbs and reserved crispy bacon finishes the presentation with both visual appeal and textural brilliance. Get ready to elevate your appetizer game and discover why this specific recipe is destined to become your new party essential.
Why You’ll Love This Jalapeño Popper Cheese Ball: The Perfect Party Starter
If you’re hosting a gathering, big or small, the last thing you want is to be stuck in the kitchen while your guests mingle. That’s precisely why you’ll fall head over heels for this incredible Jalapeño Popper Cheese Ball. It’s a true hero of make-ahead appetizers, designed for maximum flavor with minimum last-minute fuss. But the love affair doesn’t stop at convenience; it’s the sensory experience that truly sets this dish apart.
A Symphony of Contrasting Textures and Bold Flavors
What makes a jalapeño popper so satisfying? It’s the contrast! This cheese ball captures that magic perfectly. You have the utterly smooth, rich, and tangy cream cheese base, which melts beautifully in your mouth. Tucked inside are flecks of salty, savory bacon and the sharp, fresh bite of minced jalapeños. Then, the exterior coating introduces the glorious crunch. We use Panko breadcrumbs because they deliver an incomparable crispiness that standard breadcrumbs simply can’t match. Every spreadable bite offers creaminess, heat, smoke, salt, and crunch a full flavor spectrum that is dangerously addictive. The combination of heat (from the jalapeños) and cooling dairy (from the cream cheese base) creates that craveable balance that is signature to a great popper.
Effortless Elegance: The Make-Ahead Masterpiece
The vast majority of the preparation for this Jalapeño Popper Cheese Ball is completed hours, or even a day, before your guests arrive. This recipe requires four hours of crucial chilling time, which is actually a blessing. It allows the Monterey Jack and cream cheese to firm up perfectly, making it easy to roll and coat. More importantly, this extended chill time allows the garlic, green onions, and fresh jalapeños to fully permeate the cream cheese mixture, deepening the overall flavor profile. On the day of the event, all you have to do is quickly roll the hardened ball in the coating and place it on a serving platter. This freedom from kitchen duty is invaluable when hosting. For other easy and elegant appetizer ideas, check out this guide on Gambas al Ajillo (Garlic Shrimp), another fantastic make-ahead option.
Customizable Heat and Intensity
Not everyone has the same tolerance for spice, and this recipe brilliantly accommodates that. The heat level is entirely in your hands. We instruct you to thoroughly remove all seeds and white membranes (pith) from the jalapeños, as this is where 90% of the capsaicin resides. By mincing only the green flesh, you get the distinct, earthy flavor of the pepper with a manageable background warmth. If you want things spicier, simply leave a few of the seeds in, or incorporate a tiny amount of finely minced serrano pepper alongside the jalapeños. This customization ensures your Jalapeño Popper Cheese Ball is perfect for everyone at the table.
Why You Should Try This Specific Jalapeño Popper Cheese Ball Recipe Today
You might have seen other cheese ball recipes, but this specific formulation is designed for optimal flavor and structure, incorporating key culinary techniques that guarantee success. We’re not just mixing ingredients; we’re balancing moisture, fat content, and temperature to achieve the perfect spreadable consistency and maximum flavor saturation. This is the definitive recipe for the ultimate spicy cheese spread.
The Importance of Temperature: Softened Cream Cheese
The instructions stress the need for completely softened cream cheese, and this detail is paramount. Using cold cream cheese leads to a lumpy, difficult-to-mix base. Even worse, if you try to force mix cold cream cheese, you risk incorporating too much air or over-beating the mixture once the other ingredients are added. By ensuring the cream cheese is truly at room temperature (at least one hour out of the fridge), you achieve a uniform, creamy texture effortlessly. This smooth base allows the shredded Monterey Jack cheese, the bacon, and the finely minced jalapeños to integrate evenly, ensuring every spoonful of the Jalapeño Popper Cheese Ball tastes consistent and delicious.
Maximizing the Bacon Factor for Ultimate Flavor
Bacon is not just an add-in; it’s a flavor component crucial to the “popper” experience. In this recipe, we use thick-cut bacon, which offers superior texture and smoky flavor compared to thin-cut varieties. Critically, we divide the bacon into two parts: the majority is folded inside to infuse the cheese mixture with smoky, salty flavor, while a dedicated 2 tablespoons are reserved and incorporated into the outer coating. This dual application means you get the rich interior flavor and a delightful burst of smoky crunch on the surface, ensuring the bacon flavor hits your palate immediately. This attention to detail elevates this from a simple cheese ball to a gourmet Jalapeño Popper Cheese Ball.
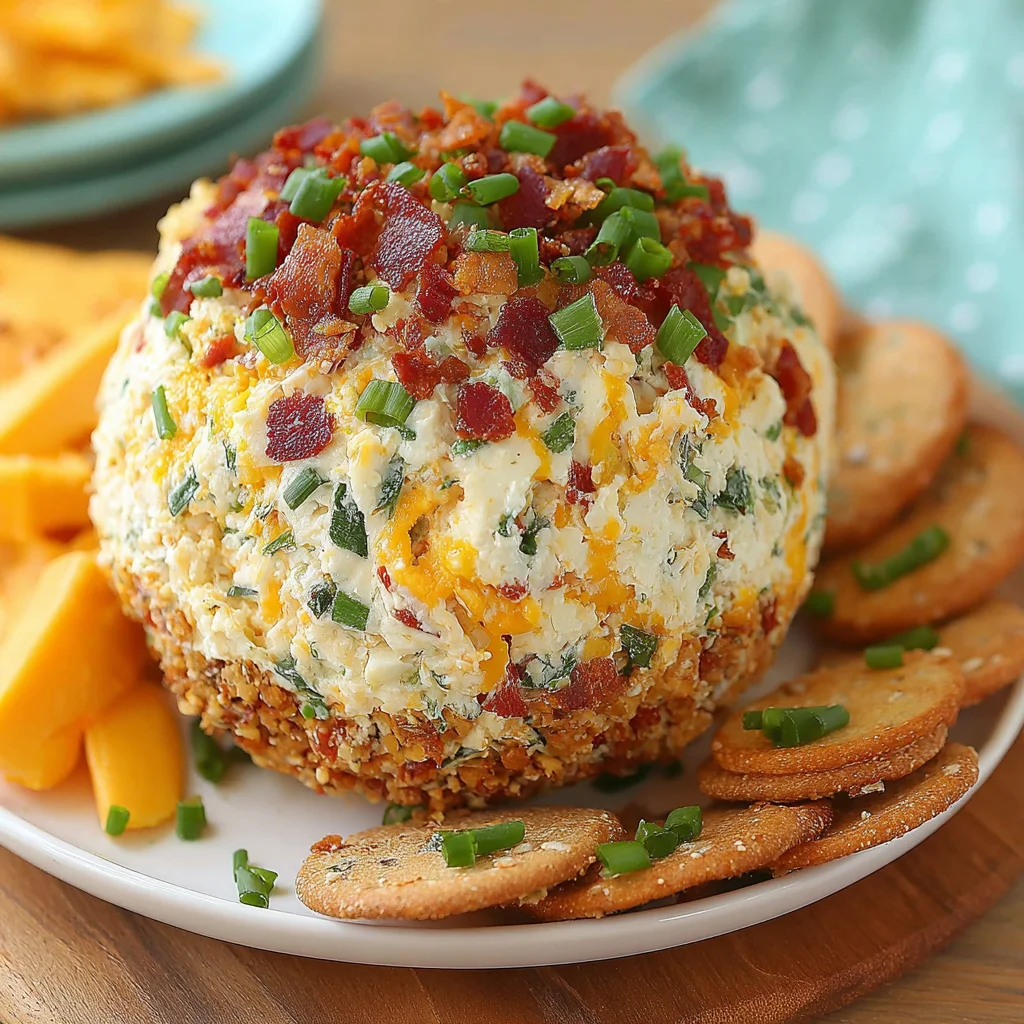
Elevating Presentation with Panko and Fresh Herbs
A successful appetizer must look as good as it tastes. The outer coating of crispy Panko breadcrumbs, combined with the reserved bacon, provides that necessary texture, but the addition of finely snipped fresh chives or cilantro is a game-changer for presentation. This touch of green not only adds a lovely contrast against the white cheese ball and golden Panko but also introduces a fresh, herbaceous note that cuts through the richness of the cream cheese. It transforms the finished Jalapeño Popper Cheese Ball into a stunning centerpiece, instantly signaling quality and effort to your guests. For more show-stopping appetizers that work well for parties, consider mastering a classic Empanada Recipe.
Ingredients and Necessary Utensils for the Copy-Paste Ready Jalapeño Popper Cheese Ball
Success in making the perfect creamy, crunchy, and spicy Jalapeño Popper Cheese Ball begins with high-quality ingredients and the right tools. Pay close attention to the preparation notes, especially regarding temperature and mincing size these details are non-negotiable for the ideal texture.
Detailed Ingredient List: Precise Quantities
For the Cream Cheese Base:
- 2 (8-ounce) packages full-fat cream cheese: Absolutely essential that this is completely softened to room temperature. This takes at least one hour. Do not use low-fat cream cheese; the full-fat variety provides the necessary richness and structure.
- 1 cup finely shredded Monterey Jack cheese: Monterey Jack melts beautifully and offers a mild, creamy counterpoint. Sharp white cheddar can be substituted if you prefer a tangier finish in your Jalapeño Popper Cheese Ball.
For the Jalapeño Popper Filling:
- 8 slices thick-cut bacon: Cooked until very crispy. Cooking the bacon well in advance is highly recommended. The fat should be rendered fully, leaving very dry, crisp pieces for easy crumbling.
- 2 to 3 medium fresh jalapeños: Crucially, the stems, seeds, and membranes (the white pith inside) must be thoroughly removed. They need to be very finely minced. Using 2 jalapeños provides moderate heat; 3 is recommended for those who love maximum spice in their Jalapeño Popper Cheese Ball.
- 1/4 cup finely sliced green onions: Use only the white and light green parts. These add a mild onion flavor without the harshness of a yellow onion.
- 1 teaspoon fresh garlic, finely minced: Fresh is best here; garlic powder will not provide the same depth of flavor.
- 1/2 teaspoon kosher salt: Kosher salt provides a cleaner salinity compared to iodized table salt.
- 1/4 teaspoon freshly ground black pepper: Freshly ground pepper offers the best aroma and sharp flavor.
For the Outer Coating/Garnish:
- 1/2 cup crispy Panko breadcrumbs: Panko is paramount for the superior crunch. Toasting them lightly in a dry pan before mixing the coating is an optional, but highly recommended, step to deepen their color and flavor.
- The reserved 2 tablespoons of finely crumbled crispy bacon: This must be very finely crumbled for adherence to the cheese ball’s surface.
- 1/4 cup finely snipped fresh chives or finely diced fresh cilantro (optional): This adds essential color, freshness, and a final herbaceous layer to your finished Jalapeño Popper Cheese Ball.
Recommended Tools or Utensils for Recipe Success
While this recipe is simple, having the right equipment ensures the mixing and chilling process goes smoothly, guaranteeing a picture-perfect Jalapeño Popper Cheese Ball.
- Stand Mixer or Hand Mixer: While a wooden spoon is possible, a mixer fitted with a paddle attachment makes incorporating the cream cheese and shredded cheese incredibly easy and fast, ensuring a smooth base texture.
- Large Mixing Bowl: Necessary for combining the base and the popper ingredients without making a mess.
- Sharp Knife and Cutting Board: Essential for the delicate task of mincing the jalapeños and garlic. Remember to wear gloves or wash your hands immediately after handling spicy peppers!
- Rubber Spatula: Ideal for gently folding in the bacon and jalapeños, preventing overmixing, and scraping down the sides of the bowl.
- Plastic Wrap: Crucial for shaping the cheese ball and ensuring it maintains its sphere shape during the crucial chilling phase.
- Shallow Dish or Plate: Used specifically for rolling the firm cheese ball in the coating mixture.
- Serving Platter: For final presentation alongside your chosen dipping accoutrements.
Detailed Recipe Steps: Creating the Ultimate Jalapeño Popper Cheese Ball
Follow these instructions precisely to ensure your cheese ball is structurally sound, intensely flavored, and ready to impress.
Step 1: Preparing the Base Mixture and Ingredients
- Temperature is Key: Confirm that the two packages of cream cheese have been sitting at room temperature for at least one full hour. This step is the foundation of a smooth cheese ball.
- Whip the Cream Cheese: In a large mixing bowl (or the bowl of a stand mixer), place the fully softened cream cheese. Beat the cream cheese on medium-low speed until it is entirely smooth, light, and uniform in texture. This usually takes only 1 to 2 minutes. Do not skip achieving a smooth, lump-free base before adding anything else.
- Add the Secondary Cheese: Incorporate the 1 cup of shredded Monterey Jack cheese into the cream cheese base. Mix thoroughly until the Monterey Jack is just combined and evenly distributed throughout the cream cheese. Scrape down the sides of the bowl to ensure full incorporation.
Step 2: Integrating the Popper Flavors and Spice
- Bacon Integration: Take the majority of the finely crumbled, crispy bacon. Remember to reserve 2 tablespoons designated for the exterior coating. Gently fold the interior bacon into the cream cheese mixture using a rubber spatula.
- Add the Heat: Add the very finely minced jalapeños (ensure all white pith and seeds are removed). Remember that fine mincing is essential so that the jalapeño pieces blend seamlessly into the spread. Also add the minced fresh garlic and the finely sliced green onions.
- Seasoning: Sprinkle the 1/2 teaspoon of kosher salt and the 1/4 teaspoon of black pepper over the ingredients. The salt is vital for balancing the richness of the cheese.
- Final Fold: Mix all the ingredients together very carefully. Use a rubber spatula to fold the ingredients from the bottom to the top. The goal is to ensure the jalapeños, bacon, and seasoning are evenly distributed throughout the entire mixture. Important Tip: Do not overmix here, or the friction will warm the mixture, making it difficult to shape later.
Step 3: Forming and Crucially Chilling the Jalapeño Popper Cheese Ball
- Prepare the Wrap: Lay out a large sheet of plastic wrap on your counter surface.
- Shape the Mixture: Scoop the entire cheese ball mixture onto the center of the plastic wrap. Use the plastic wrap to help guide and compress the mixture. Pull the edges of the plastic wrap upward and inward, gradually forming the cheese mixture into a round, spherical shape. Try to keep the shape as even and smooth as possible; this prevents a lopsided final product.
- Tight Seal and Chill: Once shaped, wrap the cheese ball tightly in the plastic wrap, pressing out any air bubbles, and seal the wrap completely. Place the tightly wrapped ball onto a small plate or baking sheet to maintain its shape and refrigerate for a minimum of 4 hours.
- Crucial Chilling Note: Chilling is essential! It allows the flavors to deeply meld together, firming the texture so the ball holds its shape, and ensuring it is hard enough to accept the outer coating without collapsing. For the very best results, plan ahead and chill your Jalapeño Popper Cheese Ball overnight.
Step 4: Preparing the Outer Coating and Finishing the Ball
- Prepare the Coating Mix: About 20 minutes before you plan to serve, prepare the coating mixture. In a shallow dish or plate, combine the 1/2 cup of Panko breadcrumbs, the reserved 2 tablespoons of crispy bacon crumbles, and the optional snipped chives or cilantro. Stir the coating ingredients together until they are evenly mixed.
- Coat the Ball: Remove the firm Jalapeño Popper Cheese Ball from the refrigerator and carefully discard the plastic wrap.
- Roll and Press: Gently place the firm cheese ball into the center of the coating mixture. Roll the cheese ball firmly in the coating, using the palms of your hands to slightly press the coating onto the surface. The coating must adhere completely and evenly cover the entire sphere. Ensure the bottom is coated just as thoroughly as the top.
Step 5: Serving and Presentation
- Plating: Transfer the finished Jalapeño Popper Cheese Ball to a stunning serving platter. Arrange your crackers and dippers around the base.
- Allow to Soften Slightly: Allow the cheese ball to sit at room temperature for 15 to 20 minutes before serving. This slightly softens the exterior, making it easier for guests to spread without distorting the ball’s shape or cracking the coating.
- Serve: Serve immediately with sturdy crackers (like Triscuits or pita chips), crostini, bagel chips, pretzels, or sliced fresh vegetables (carrots, celery, bell peppers). Leftovers can be wrapped tightly and stored in the refrigerator for up to 5 days. You can refresh the coating if needed by lightly rolling it again before the next serving. We also love serving complementary salty appetizers like this Savory Basque Cheesecake to balance the spice.
Tips and Variations for Your Jalapeño Popper Cheese Ball
This recipe is robust, but there are countless ways to customize the heat, flavor, and dietary requirements to suit your guests. These tips will help you master the recipe and avoid common pitfalls.
Ingredient Alternatives and Flavor Boosters
- Cheese Swap: While Monterey Jack is ideal, you can replace it entirely with sharp cheddar cheese for a tangier profile, or use Pepper Jack cheese for an extra kick inside the mixture.
- Cream Cheese Base Alternative: For a slight tang, incorporate 1/4 cup of sour cream or Greek yogurt into the cream cheese mixture (ensure you slightly reduce the amount of shredded cheese to maintain structure).
- Spice Variations: If you don’t have fresh jalapeños, use 1/2 teaspoon of dried red pepper flakes, or substitute the fresh pepper with 2 tablespoons of finely minced pickled jalapeños (pat them dry first). For a smokier heat, add a pinch of smoked paprika to the mixture.
- Bacon Alternative (Vegetarian Option): If you need a vegetarian cheese ball, simply omit the bacon. You can replace the savory, umami flavor by adding 1/2 teaspoon of smoked paprika and a finely minced sun-dried tomato for depth.
- Gluten-Free Option: The only ingredient containing gluten is typically the Panko breadcrumbs. Easily substitute the Panko coating with finely crushed gluten-free crackers, toasted finely chopped pecans, or a commercially available gluten-free breadcrumb mix.
Advice to Avoid Common Mistakes
The two main problems encountered when making a Jalapeño Popper Cheese Ball are a soft, slumping ball and an unevenly coated exterior.
- Mistake 1: Too Soft a Mixture: If your cheese ball mixture is too soft after mixing, it means the cream cheese was too warm or you overmixed it. To fix this, place the mixture (before shaping) into the freezer for 15-20 minutes to firm up slightly. Always ensure the refrigeration step is at least 4 hours do not rush this. A properly chilled cheese ball will feel dense and solid.
- Mistake 2: Lumpy Base: If your final product has lumps of cream cheese, it means the cream cheese was not fully softened before mixing. There is no easy fix once the ingredients are added, so always ensure the cream cheese has reached room temperature (squishes easily with a fingertip) before starting.
- Mistake 3: Uneven Coating: If the coating won’t stick, your cheese ball might be too cold (which causes condensation) or you aren’t pressing hard enough. Roll the firm ball slowly and apply slight pressure with your palms to ensure the Panko and bacon adhere deeply to the surface.
- Safety First: When handling fresh jalapeños, the capsaicin oil can burn sensitive skin. Wear disposable gloves or ensure you wash your hands thoroughly with soap and water immediately after mincing the peppers, especially before touching your eyes or face.
Make-Ahead and Storage Tips
The Jalapeño Popper Cheese Ball is an ideal make-ahead appetizer:
- Long-Term Prep: The fully mixed and shaped cheese ball (before the final coating) can be stored tightly wrapped in plastic wrap and aluminum foil in the refrigerator for up to 1 week.
- Freezing: You can even freeze the unrolled cheese ball! Wrap it extremely tightly in multiple layers of plastic wrap, followed by foil. It can last up to 1 month. Thaw it slowly in the refrigerator overnight before rolling it in the coating and serving.
- Refreshing the Coating: If you have leftovers, the coating might absorb moisture in the fridge. Before the next serving, you can often roll the ball lightly in a few extra Panko crumbs to refresh the crunch.
Nutritional Values and Benefits of the Jalapeño Popper Cheese Ball
While this Jalapeño Popper Cheese Ball is undoubtedly an indulgent appetizer, perfect for celebrations, understanding its components allows you to appreciate its richness and the benefits certain ingredients bring to the table. Please note that exact nutritional values depend heavily on serving size and the specific brands of bacon and cheese used. For estimation purposes, we will consider 1/16th of the entire cheese ball as one serving.
Estimated Nutritional Breakdown (Per 1/16th Serving, excluding crackers)
This is an approximation for guidance only:
- Calories: Approximately 220 – 260 kcal
- Protein: Approximately 10 – 12 g
- Total Fat: Approximately 19 – 22 g (Mostly saturated fat from cream cheese and bacon)
- Carbohydrates: Approximately 3 – 5 g (Primarily from Panko and residual lactose)
- Sodium: Approximately 300 – 400 mg (Highly dependent on bacon salt content)
The Benefits of Key Ingredients
- Cream Cheese and Monterey Jack: These dairy components are excellent sources of calcium, vital for bone health, and protein, which is crucial for muscle repair and satiety. The full-fat nature of these cheeses also ensures that the cheese ball is highly satisfying, meaning a smaller portion goes a long way.
- Bacon (in moderation): Bacon provides a good source of protein and essential B vitamins, including B12. While high in fat and sodium, when used as a flavorful ingredient in a shared appetizer like this Jalapeño Popper Cheese Ball, it adds intense flavor complexity.
- Jalapeños: Beyond the heat, jalapeños are packed with Vitamin C and Vitamin A. The capsaicin, the compound responsible for the heat, is known to temporarily boost metabolism and potentially act as an anti-inflammatory agent. Eating fresh jalapeños provides a low-calorie way to add a wealth of flavor and mild nutritional benefits to a rich dish.
- Fresh Garlic and Green Onions: These alliums are known for their health-promoting properties. Garlic contains sulfur compounds that are thought to support immune function, while green onions provide antioxidants and a dose of Vitamin K. They are essential to the fresh, vibrant flavor of the Jalapeño Popper Cheese Ball.
Remember that this Jalapeño Popper Cheese Ball is designed as a centerpiece appetizer to be shared among many guests. Enjoyed responsibly, it is a delicious and memorable part of any celebratory menu!
Frequently Asked Questions (FAQs) About the Jalapeño Popper Cheese Ball
How far in advance can I make the Jalapeño Popper Cheese Ball?
You can prepare the cheese mixture, shape the ball, and keep it tightly wrapped (without the coating) in the refrigerator for up to 5 to 7 days. Add the Panko and bacon coating no more than 24 hours before serving to maintain the maximum crunch and freshness of the exterior.
My cheese ball is too soft and won’t hold its shape. What did I do wrong?
A soft cheese ball usually means it was not chilled long enough, or the cream cheese was too warm during mixing. Ensure you chill the Jalapeño Popper Cheese Ball for the minimum required 4 hours, or ideally, overnight. If you are mixing on a very hot day, work quickly to keep the mixture cool.
Can I use jarred or canned jalapeños instead of fresh ones in this Jalapeño Popper Cheese Ball recipe?
Yes, you can substitute fresh jalapeños with jarred ones, but you must pat them extremely dry first. Jarred peppers add a tangier, pickled flavor compared to the fresh, vegetal flavor. Start with slightly less (about 1/4 cup) since pickled peppers are often softer and more uniform in heat.
What are the best accompaniments or dippers to serve with a Jalapeño Popper Cheese Ball?
Since the cheese ball is rich and creamy, you need sturdy dippers. Excellent choices include sturdy butter crackers, bagel chips, toasted crostini, pretzels, or pita chips. For a lighter option, use fresh vegetable sticks like carrots, cucumber, celery, or red bell pepper slices.
How can I make this cheese ball spicier?
To increase the heat of your Jalapeño Popper Cheese Ball, you can leave some of the seeds and white membranes (pith) in the jalapeños, or substitute one jalapeño with a smaller, hotter pepper like a serrano. Alternatively, mix in a dash of cayenne pepper or a teaspoon of hot sauce (ensure it’s not too watery) into the cream cheese base.
Is it better to use Panko or regular breadcrumbs for the coating?
Panko breadcrumbs are vastly superior for this recipe. Panko has a larger, flakier structure than traditional breadcrumbs, resulting in a much crispier, lighter, and more satisfying crunch that complements the creamy interior perfectly. Always opt for Panko when seeking maximum texture in your Jalapeño Popper Cheese Ball coating.
Conclusion: Your New Go-To Jalapeño Popper Cheese Ball Recipe
We’ve walked through every essential step, from ensuring your cream cheese is perfectly softened to mastering the crucial chilling time and achieving that irresistible crispy Panko and bacon coating. This Jalapeño Popper Cheese Ball recipe is more than just an appetizer; it’s a commitment to low-stress, high-impact entertaining. It delivers on the promise of the classic jalapeño popper spicy, smoky, and unbelievably creamy all wrapped up in a convenient, spreadable sphere ready for dipping.
By following the precise instructions regarding ingredient preparation and temperature, you guarantee a perfect texture and a deep, complex flavor profile that will impress even the most discerning palate. Remember the key takeaways: soft cream cheese for smoothness, dual application of bacon for flavor, and a minimum of four hours chilling time for structure. This recipe truly allows you to handle the heavy lifting hours or even days ahead, freeing you up to enjoy your guests when it matters most.
Ready to save this ultimate appetizer for your next game day or holiday gathering? Be sure to pin this recipe and check out my Pinterest board for more incredible savory snack ideas. Give this Jalapeño Popper Cheese Ball a try you won’t regret it. Once you’ve made it, come back and let me know in the comments how big of a hit it was! Happy hosting, and enjoy the crunch!
THE COPY-PASTE READY RECIPE FOR THE ULTIMATE JALAPEÑO POPPER CHEESE BALL
Ingredients
Equipment
Method
- Ensure the two packages of cream cheese have been sitting at room temperature for at least one hour. Beat the cream cheese in a large mixing bowl (using a paddle attachment or hand mixer) until it is smooth, light, and completely uniform in texture, about 1 to 2 minutes.
- Add the 1 cup of shredded Monterey Jack cheese to the cream cheese base and mix thoroughly until just combined. Scrape down the sides of the bowl as needed.
- Take the majority of the finely crumbled, crispy bacon (reserving the 2 tablespoons designated for the coating) and gently fold it into the cream cheese mixture.
- Add the very finely minced jalapeños (remembering to wash your hands thoroughly after handling), the minced fresh garlic, the sliced green onions, the kosher salt, and the black pepper to the bowl.
- Mix all the ingredients together very carefully. Use a rubber spatula to fold the ingredients from the bottom to the top, ensuring that the jalapeños and bacon are evenly distributed throughout the entire cheese mixture. Do not overmix, or the mixture will become too warm.
- Lay out a large piece of plastic wrap on your counter surface. Scoop the entire cheese ball mixture onto the center of the plastic wrap. Using the plastic wrap to help guide the mixture, form the cheese mixture into a round, spherical shape.
- Wrap the cheese ball tightly in the plastic wrap, pressing out any air bubbles, and seal the wrap completely. Place the tightly wrapped cheese ball onto a small plate or baking sheet and refrigerate for a minimum of 4 hours. For best results, chill overnight.
- Prepare the coating mixture: In a shallow dish or plate, combine the 1/2 cup of Panko breadcrumbs, the reserved 2 tablespoons of crispy bacon crumbles, and the optional snipped chives. Stir the coating ingredients together until they are evenly mixed.
- Remove the firm cheese ball from the refrigerator and discard the plastic wrap. Gently place the cheese ball into the center of the coating mixture. Roll the cheese ball firmly in the coating, pressing the coating onto the surface so that it adheres completely and evenly covers the entire sphere.
- Transfer the finished cheese ball to a serving platter. Allow it to sit at room temperature for 15 to 20 minutes before serving, as this slightly softens the exterior, making it easier to spread. Serve immediately with sturdy crackers, crostini, or sliced fresh vegetables.


