The scent of pine needles, the twinkle of lights, and the taste of cool, crisp peppermint blended seamlessly with rich, luxurious chocolate these are the hallmarks of the holiday season. And few treats capture that festive magic quite like classic homemade Peppermint Bark. This easy-to-make confection is not just a candy; it’s an edible expression of holiday cheer, offering a perfect blend of high-contrast flavors and satisfying textures: the smooth melt of the chocolate giving way to the invigorating crunch of crushed candy canes.
If you’ve ever bought commercial peppermint bark, you know how addictive it is. But making it at home elevates the experience entirely. You control the quality of the chocolate, the intensity of the peppermint, and the density of the candy cane topping. Forget complicated holiday baking projects that require hours of kneading or meticulous decorating. This recipe for homemade Peppermint Bark is a straightforward, no-bake project that delivers maximum impact with minimal effort, making it the ideal recipe for gifting, sharing, or simply hoarding for yourself during those cozy winter nights. Get ready to transform simple ingredients into a dazzling, professional-quality holiday staple.
Why You’ll Love This Easy Peppermint Bark Recipe (The Magic of Contrast)
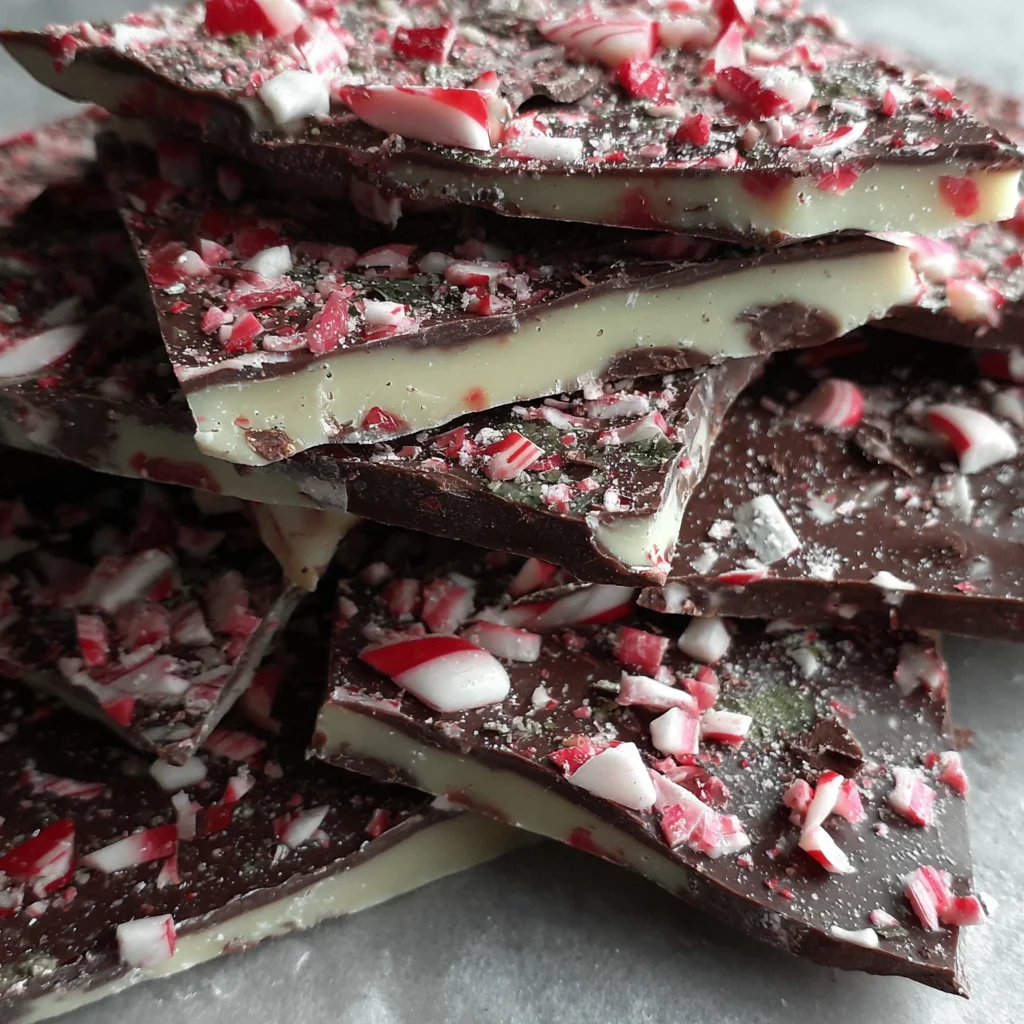
This recipe for Peppermint Bark isn’t just easy; it’s genuinely satisfying to make and utterly delightful to eat. We are talking about a powerful sensory experience built entirely on contrast. The dark chocolate base provides a deep, slightly bitter foundation that anchors the flavor profile. This richness is immediately contrasted by the sweet, creamy, vanilla-forward flavor of the white chocolate top layer. Then comes the cooling sensation of pure peppermint extract, which cuts through the richness of both chocolates, providing that essential festive zing. Finally, the physical contrast: the silky smoothness of the melted chocolate layers is topped with the sharp, uneven crunch of the crushed candy canes.
Beyond the taste and texture, you will love the sheer visual appeal of this homemade candy. The striking dichotomy of dark brown against brilliant white, studded with ruby-red and white flecks, makes the Peppermint Bark look sophisticated and festive. It is stunningly photogenic and looks absolutely magnificent packaged in a simple cellophane bag or a festive tin. This makes it an invaluable addition to your holiday gifting repertoire.
Furthermore, this recipe is incredibly forgiving. Unlike delicate pastries or finicky French desserts, the only real skill required here is melting chocolate, and we walk you through the simplest method. Even if you are a novice in the kitchen, you can create a batch of professional-grade Peppermint Bark that will impress everyone. It’s a project that brings instant gratification, as the chilling time is relatively short, allowing you to go from ingredients to a finished, beautiful treat in under two hours (mostly hands-off time!). If you are looking for a quick, impactful, and utterly delicious homemade gift, look no further than this definitive guide to crafting the perfect chocolate bark.
Why You Should Try Making Homemade Peppermint Bark This Year
The holiday season often brings with it a whirlwind of commitments and complex baking demands. If the thought of whipping up a complicated Tarta de Queso Vasca or a delicate pastry fills you with dread, then making homemade Peppermint Bark is your perfect culinary relief. This recipe requires absolutely zero baking time and minimal active participation, positioning it as the ultimate stress-free holiday indulgence.
One primary reason to choose this project is the speed and simplicity. You don’t need yeast, rising time, or perfect oven temperatures. You need a microwave (or a double boiler) and a refrigerator. The entire process of melting and layering the chocolate takes less than 20 minutes, followed by chilling. This efficiency allows you to create large batches quickly, which is essential when the gifting list seems endless. You can easily quadruple the recipe without significantly increasing the prep time.
Moreover, homemade is almost always superior to store-bought, especially when it comes to chocolate bark. Store-bought versions often use compound chocolate (which contains vegetable oil instead of cocoa butter), resulting in a waxy texture and an underwhelming flavor. When you make this Peppermint Bark yourself, you get to select high-quality melting chocolate, ensuring a luxurious, smooth, and satisfying mouthfeel that melts beautifully the moment it hits your tongue. High-quality chocolate makes an enormous difference in the finished product’s flavor profile, elevating this simple candy from basic sweet treat to gourmet confection.
The sheer joy of personalization is another compelling reason. While the classic two-tone chocolate is traditional, you can easily adapt this base recipe. Adding a pinch of sea salt to the dark layer, using milk chocolate instead of semi-sweet, or even swirling the white and dark chocolates together offers endless variations. This recipe serves as a canvas. And, compared to the complexity of traditional Spanish holiday recipes, such as perfecting the dough for homemade empanadas, this bark is remarkably foolproof. It is a fantastic entry point for beginner candy makers and a cherished tradition for seasoned holiday cooks. It truly simplifies the holiday cooking list, letting you focus on the fun part the crushing of the candy canes and the breaking of the finished, glorious slab of Peppermint Bark.
Ingredients and Utensils: The Building Blocks of Perfect Bark
Achieving outstanding results with Peppermint Bark hinges on two factors: quality ingredients and correct technique. Since this recipe is so minimalist, every ingredient plays a vital role. Do not skimp on the chocolate; the difference between using generic chips and high-quality melting wafers is monumental.
Essential Peppermint Bark Ingredients
Here is the precise list of ingredients needed to create one standard 9×13 batch of this holiday classic:
- 16 oz White Chocolate: High-quality melting wafers, discs, or blocks are highly recommended over standard white chocolate chips. Wafers contain cocoa butter, which melts smoothly and sets with a beautiful snap. Chips often contain stabilizers that can make the final texture grainy or difficult to spread. For the best flavor and texture in your Peppermint Bark, look for high-cacao butter content.
- 8 oz Semi-Sweet or Dark Chocolate Chips: Opt for a good quality dark chocolate (50% to 70% cocoa solids). The depth of the dark chocolate is crucial for balancing the sweetness of the white chocolate and the peppermint. Using chips is generally fine for the bottom layer, as the structure is less critical here than the top layer.
- 1 teaspoon Peppermint Extract (Divided): It is critical to use extract, not oil. Peppermint oil is highly concentrated and can cause the chocolate to seize (thicken immediately and become unusable). We divide this extract 1/2 teaspoon for the dark layer and 1/2 teaspoon for the white layer to ensure the peppermint flavor permeates the entire bark, not just the topping.
- Approximately 1 cup Candy Canes, Crushed: This typically equates to about 15-20 standard-sized candy canes. You want a variety of textures, from fine powder (which dissolves slightly into the warm chocolate, tinting it) to small, sharp shards for maximum crunch.
- 1 tablespoon Shortening (Optional, but Recommended for White Chocolate): Shortening, such as refined coconut oil or vegetable shortening (like Crisco), is a chocolatier’s trick. White chocolate is notorious for melting thicker and seizing easier than dark chocolate. Adding a small amount of fat helps thin the white chocolate, making it much easier to pour and spread evenly over the delicate dark chocolate base without dragging or clumping.
Choosing Your Chocolate: The Key to the Snap
In the world of bark, the ‘snap’ is everything. When you break the finished Peppermint Bark, it should fracture cleanly and audibly. This snap is achieved when the cocoa butter crystallizes correctly. High-quality melting wafers are pre-tempered and designed to melt smoothly and set firmly. If you use standard baking chips (especially cheaper brands), they contain less cocoa butter and more emulsifiers, which can result in a softer, waxy bark that bends rather than snaps. Investing slightly more in specialized melting chocolate will dramatically improve the final results of your holiday treat.
Necessary Utensils for Peppermint Bark Success
Fortunately, you don’t need specialized equipment for this recipe. Most of these items are already standard kitchen tools, but having them ready ensures a smooth process:
- 9×13 Inch Baking Sheet or Standard Cookie Sheet: The larger the pan, the thinner your bark will be. A standard half-sheet pan will yield a beautiful, thin bark, which is generally preferred for ease of biting.
- Parchment Paper or Wax Paper: Absolutely essential! This prevents sticking and acts as a sling to easily lift the entire slab of Peppermint Bark out of the pan for breaking. Ensure the paper overhangs the edges.
- Two Microwave-Safe Bowls (or a Double Boiler setup): Needed for melting the dark and white chocolate separately. Glass or ceramic bowls work best for microwave melting.
- Rubber Spatula or Offset Spatula: Ideal for gently spreading the layers of chocolate evenly without disturbing the parchment underneath.
- Rolling Pin or Heavy Pot: Used for crushing the candy canes. A heavy-bottomed pan often works better than a rolling pin for achieving a quick, uneven crush.
- Zip-Top Bag (Freezer Quality): Necessary for containing the candy canes while crushing them. A thin sandwich bag might rupture, so use a high-quality freezer bag.
- Sharp, Heavy Kitchen Knife: Required for cutting the bark into clean squares, though many prefer the rustic look of breaking it by hand.
Detailed Recipe Steps: Creating the Perfect Layers
Follow these steps precisely for a flawless, beautiful, and delicious batch of homemade Peppermint Bark. Timing and temperature management are key to preventing the layers from melting into each other.
1. Preparation: The Foundation
First, set up your workstation. Line a 9×13 inch baking sheet or a standard cookie sheet with parchment paper or wax paper. Ensure the paper hangs over the sides slightly to create “handles” that will make removing the solidified bark effortless later.
Next, tackle the topping. Crush the candy canes. Place the approximately 1 cup of candy canes inside a sturdy, zip-top freezer bag. Lay the bag flat on a counter, cover it with a kitchen towel (to absorb the shock and reduce noise), and use a rolling pin or the bottom of a heavy pot to break them into small, uneven pieces. You want a mix of fine powder and small shards. Set the crushed candy canes aside in a small bowl; you need them immediately after spreading the white chocolate.
2. Melting and Spreading the Dark Chocolate Layer
In a microwave-safe bowl, place the 8 oz of semi-sweet or dark chocolate chips. Microwave the chocolate in 30-second intervals, stirring well after each interval with a dry spatula. This slow, controlled heating prevents scorching. Continue until the chocolate is smooth and fully melted. Alternatively, melt using a double boiler over simmering water, ensuring the bottom of the bowl does not touch the water.
Once melted, stir in 1/2 teaspoon of the peppermint extract into the dark chocolate. Mix thoroughly to ensure the flavor is evenly distributed.
Pour the melted dark chocolate immediately onto the prepared baking sheet. Use a rubber spatula or the back of a spoon to spread the chocolate evenly into a thin layer. Aim for approximately 1/8 to 1/4 inch thickness. Work quickly before the chocolate starts to set.
3. Setting the Dark Chocolate
Place the baking sheet carefully in the refrigerator for about 15 to 20 minutes, or until the dark chocolate is completely set and firm to the touch. This step is crucial. If the dark chocolate layer is not fully firm, the heat from the white chocolate layer will melt it, causing the layers to swirl together (which can look messy) or, worse, for the cocoa butter to separate, ruining the integrity of the bark.
4. Melting and Flavoring the White Chocolate Layer
While the dark layer is chilling, prepare the white chocolate. In a separate, clean, dry microwave-safe bowl, melt the 16 oz white chocolate wafers or chips. Use the same precise technique: 30-second intervals, stirring well between each one. White chocolate is more delicate and prone to seizing, so go slowly and stop when there are still a few small unmelted lumps; stirring will melt the rest using residual heat.
If the white chocolate seems excessively thick or difficult to stir, now is the time to stir in the optional 1 tablespoon of shortening. This addition will create a smoother, more fluid, and spreadable consistency, making application much easier.
Stir in the remaining 1/2 teaspoon of peppermint extract into the melted white chocolate. Mix well.
5. Combining the Layers and Adding Topping
Remove the dark chocolate base from the refrigerator. It should be hard.
Pour the warm, melted white chocolate directly over the set dark chocolate layer.
Working quickly but gently, use your spatula to spread the white chocolate evenly over the dark chocolate base. Minimize movement and pressure to avoid disturbing the bottom layer. You must work fast, as the cold dark chocolate will rapidly cool and thicken the white chocolate.
Immediately, while the white chocolate is still warm and tacky, sprinkle the crushed candy canes evenly over the entire surface. Gently press them down with the back of a clean spoon or your hand to ensure they firmly adhere to the white chocolate. If you wait too long, the candy canes will not stick properly.
6. Final Setting and Breaking the Bark
Return the baking sheet to the refrigerator and chill for at least 1 hour, or until both layers are completely hard and firm. Do not rush this step; full setting is essential for a clean break.
Once fully set, remove the bark from the refrigerator. Lift the entire slab out of the pan using the parchment paper handles.
Peel off the parchment paper. Place the bark on a large, stable cutting board. You can use a sharp, heavy knife to cut the Peppermint Bark into uniform squares for a professional look, or, for a more rustic charm, simply break the bark into irregular, satisfying pieces by hand. The irregular pieces often look more tempting!
Storage
Store the finished Peppermint Bark in an airtight container. It keeps beautifully at room temperature (in a cool environment) or in the refrigerator for up to 2 weeks. Be aware that humidity can make the crushed candy canes sticky, so ensuring the container is truly airtight is important.
Tips, Variations, and Troubleshooting for Peppermint Bark Success
While this recipe is straightforward, a few expert tips can guarantee perfection, and several variations can keep your holiday treats fresh and exciting year after year. Mastery of Peppermint Bark lies in understanding chocolate’s delicate nature.
Avoiding Common Mistakes: The Chocolate Police
The Problem of Seizing Chocolate
Seizing is the enemy of all chocolate bark makers. It occurs when a tiny amount of liquid, such as water or steam, comes into contact with melted chocolate. The chocolate instantly thickens and turns into a grainy, unworkable paste. Tip: Ensure all your utensils, bowls, and spatulas are completely dry before you start melting. If using a double boiler, ensure no steam or simmering water splashes into the chocolate bowl. If your chocolate does seize, you can sometimes rescue it by aggressively stirring in a teaspoon of clean, hot vegetable oil or shortening until it smooths out, though the texture may be compromised.
Temperature Management
Do not melt your chocolate at high power in the microwave. High heat will scorch the chocolate, giving it a burnt, grainy texture and sometimes causing it to seize. Use medium power (50-70%) and stick strictly to 30-second intervals. Always stir between intervals.
Layer Separation and Setting
The cardinal rule of two-layer bark: The bottom layer must be cold, and the top layer must be warm, but not hot. If the white chocolate is too hot, it will instantly melt the dark chocolate, causing them to bleed together. If the white chocolate is too cool (starting to thicken), it will be impossible to spread and may lift the dark chocolate layer when you try to smooth it. Aim for the white chocolate to be easily pourable but not scalding.
Fun Peppermint Bark Variations
The Vegan Peppermint Bark
It is entirely possible to create a delicious plant-based version. Simply substitute the dark and white chocolates with high-quality vegan chocolate (often sweetened with agave or coconut sugar). The biggest challenge is finding a vegan white chocolate that melts well, but options made with cacao butter and rice powder or coconut milk solids are increasingly available. This variation allows everyone to enjoy this classic holiday sweet!
Alternative Toppings and Flavors
While crushed candy canes are classic, you can diversify your topping:
- Salted Caramel Bark: Drizzle homemade caramel sauce and sprinkle with flaked sea salt instead of peppermint.
- Holiday Cookie Bark: Crush shortbread or gingerbread cookies and sprinkle them on top.
- Nutty Crunch Bark: Add toasted almonds or pistachios to the dark chocolate layer before setting, giving the bark extra substance and complexity.
The Single-Layer Option
For even faster preparation, use only white chocolate, mixing 1/2 of the crushed candy canes directly into the white chocolate before spreading and using the remaining half as a topping. This simplifies the layering process, though the flavor contrast won’t be as sharp as the traditional two-layer approach.
Gifting and Presentation
Peppermint Bark makes the ultimate homemade gift. Package the irregular pieces in small, transparent cellophane bags tied with festive ribbons. For a professional look, store the bark in decorative metal tins. For more inspiration on beautiful holiday food presentation and festive ideas, make sure to check out my dedicated holiday boards on Pinterest: Noelia’s Recipes Blog on Pinterest. Gifting homemade treats like this not only shows thoughtfulness but often tastes far superior to store-bought alternatives.
If you’re looking for other easy, crowd-pleasing recipes that pair well with the holiday season, consider exploring simple, comforting Spanish classics like my recipe for Classic Tortilla de Patatas or a straightforward guide to making Churros con Chocolate both easy wins during the festive season.
Nutritional Values and Cacao Benefits
It is important to remember that Peppermint Bark is a holiday confection and should be enjoyed in moderation. It is essentially a mix of quality fats, sugars, and the nutritional benefits derived from cocoa solids. While we can’t call it a health food, we can appreciate the components and enjoy it mindfully.
Estimated Nutritional Breakdown (Per 1 Ounce Serving, approx. 15-20 Pieces per Batch)
Since the ingredients and yield can vary slightly depending on the thickness of the layers, the following values are approximations for a standard 1-ounce piece of two-layer Peppermint Bark:
- Calories: 140–160 kcal
- Total Fat: 8–10g (primarily from cocoa butter)
- Saturated Fat: 5–7g
- Carbohydrates: 15–18g (mostly simple sugars from candy canes and chocolate)
- Sugar: 14–17g
- Protein: 1–2g
The Benefits of Dark Chocolate (The Base Layer)
The semi-sweet or dark chocolate layer (8 oz) is the most beneficial part of this holiday treat. Dark chocolate (ideally 70% cocoa or higher) is packed with bioactive compounds, including potent antioxidants called flavonoids. These compounds have been linked to several health benefits, particularly cardiovascular health. Flavonoids can help lower blood pressure and improve blood flow. Furthermore, cacao contains trace minerals such as iron, magnesium, copper, and manganese. By choosing high-quality dark chocolate for your bark base, you inject a small dose of these beneficial nutrients into your festive indulgence.
Understanding White Chocolate
It is worth noting that white chocolate, unlike its dark counterpart, technically contains no cocoa solids, only cocoa butter. Cocoa butter is a healthy fat, but white chocolate is primarily a source of sugar and saturated fat. Its role in this recipe is to provide the rich, creamy texture and sweet contrast needed to balance the intense mint and the bitterness of the dark chocolate. Enjoying the Peppermint Bark in small amounts ensures you get the flavor payoff without excessive sugar intake.
FAQs About Peppermint Bark: Your Questions Answered
Below are some of the most frequently asked questions regarding making and storing perfect homemade Peppermint Bark, structured using SEO-friendly Schema Markup.
How long does homemade Peppermint Bark last?
Homemade Peppermint Bark, when stored properly in an airtight container, typically lasts for up to two weeks at cool room temperature (below 70°F). If stored in the refrigerator, it can last for three to four weeks, but ensure it is tightly sealed to prevent condensation, which can make the candy canes sticky.
Why did my white chocolate seize or turn grainy when making the Peppermint Bark?
Chocolate seizes (becomes thick and gritty) almost instantly when it comes into contact with a small amount of liquid, like water or steam. White chocolate is particularly sensitive. Ensure your melting bowls and spatulas are completely dry, and melt the chocolate slowly using short bursts in the microwave or a double boiler that prevents steam contact. Too high heat can also cause the cocoa butter to separate, leading to a grainy texture.
Can I freeze Peppermint Bark?
Yes, Peppermint Bark freezes well, making it excellent for long-term storage or preparing gifts far in advance. Wrap the bark tightly in plastic wrap, then place it in a freezer-safe zip-top bag or airtight container. To defrost, transfer the bark to the refrigerator for 24 hours, and then let it sit at room temperature for an hour before unwrapping to prevent condensation from forming on the surface.
Is it better to use peppermint oil or peppermint extract for this bark recipe?
It is highly recommended to use peppermint extract. Peppermint oil is extremely concentrated and, more importantly, can cause the chocolate to seize since it is not fully water-soluble and can be too harsh in flavor. The extract provides sufficient flavor and is less likely to disrupt the delicate structure of the melted chocolate layers needed for flawless Peppermint Bark.
How should I crush the candy canes for the best topping texture?
For the best visual appeal and texture, aim for an uneven crush. Place the candy canes in a thick freezer bag, cover with a towel, and hit them with a rolling pin or meat tenderizer. You want a mix of fine powder (which adheres well and slightly colors the white chocolate) and small, sharp shards for the signature crunch of the Peppermint Bark.
Why is my Peppermint Bark soft and waxy instead of hard and snappy?
This issue is almost always due to the type of chocolate used. Waxy, soft bark often results from using standard baking chips or compound chocolate, which contains vegetable oil instead of a high percentage of cocoa butter. Using high-quality melting wafers (discs) that are rich in cocoa butter will ensure a crisp, satisfying “snap” when the bark is fully set and broken.
Conclusion: The Joy of Homemade Peppermint Bark
Mastering the art of Peppermint Bark is one of the most rewarding culinary achievements of the holiday season. It’s a recipe that perfectly balances flavor, texture, and visual appeal, proving that the most memorable homemade treats don’t always require hours of labor or professional skill. By focusing on high-quality ingredients rich dark chocolate, creamy white chocolate, and potent peppermint extract you create a confection that surpasses any store-bought equivalent.
Whether you choose to break your bark into delightfully rustic shards or slice it into clean, elegant squares, the result is a guaranteed crowd-pleaser. The striking layers of chocolate and the invigorating crunch of the candy cane topping make this recipe ideal for gifting, serving at festive gatherings, or simply savoring slowly with a cup of hot cocoa on a cold winter night. This Peppermint Bark recipe truly embodies the simplicity and generous spirit of holiday home cooking. We encourage you to try this recipe immediately, enjoy the straightforward process, and delight in the spectacular results.
If you loved making this easy Peppermint Bark, please share your experience and photos in the comments below! We love hearing how you personalized your holiday treats. Don’t forget to share this recipe with friends and family who need a little extra sweetness this holiday season!
Classic Homemade Peppermint Bark (Easy Holiday Treat)
Ingredients
Equipment
Method
- Line a 9x13 inch baking sheet with parchment paper, ensuring the paper hangs over the sides slightly. Crush the candy canes thoroughly by placing them in a zip-top bag and using a rolling pin. Set the crushed candy aside.
- Melt the semi-sweet or dark chocolate chips. Use a microwave (stirring every 30 seconds) or a double boiler until completely smooth.
- Stir 1/2 teaspoon of the peppermint extract into the melted dark chocolate. Pour the chocolate onto the prepared baking sheet and spread evenly into a thin layer (about 1/8 inch thick).
- Place the baking sheet in the refrigerator for 15 to 20 minutes, allowing the dark chocolate to fully set and become firm to the touch.
- While the dark chocolate chills, melt the white chocolate wafers or chips in a separate bowl using the same technique (30-second intervals). If the chocolate seems too thick, stir in the optional 1 tablespoon of shortening for a smoother consistency.
- Stir the remaining 1/2 teaspoon of peppermint extract into the melted white chocolate. Remove the dark chocolate from the refrigerator and pour the warm white chocolate directly over the set layer.
- Quickly spread the white chocolate evenly over the dark chocolate. Immediately sprinkle the crushed candy canes evenly over the surface, gently pressing them into the warm chocolate to ensure adhesion.
- Return the baking sheet to the refrigerator and chill for at least 1 hour, or until both layers are completely hard. Once set, lift the slab using the parchment paper handles, peel off the paper, and break the bark into irregular pieces or cut into squares using a sharp knife.


