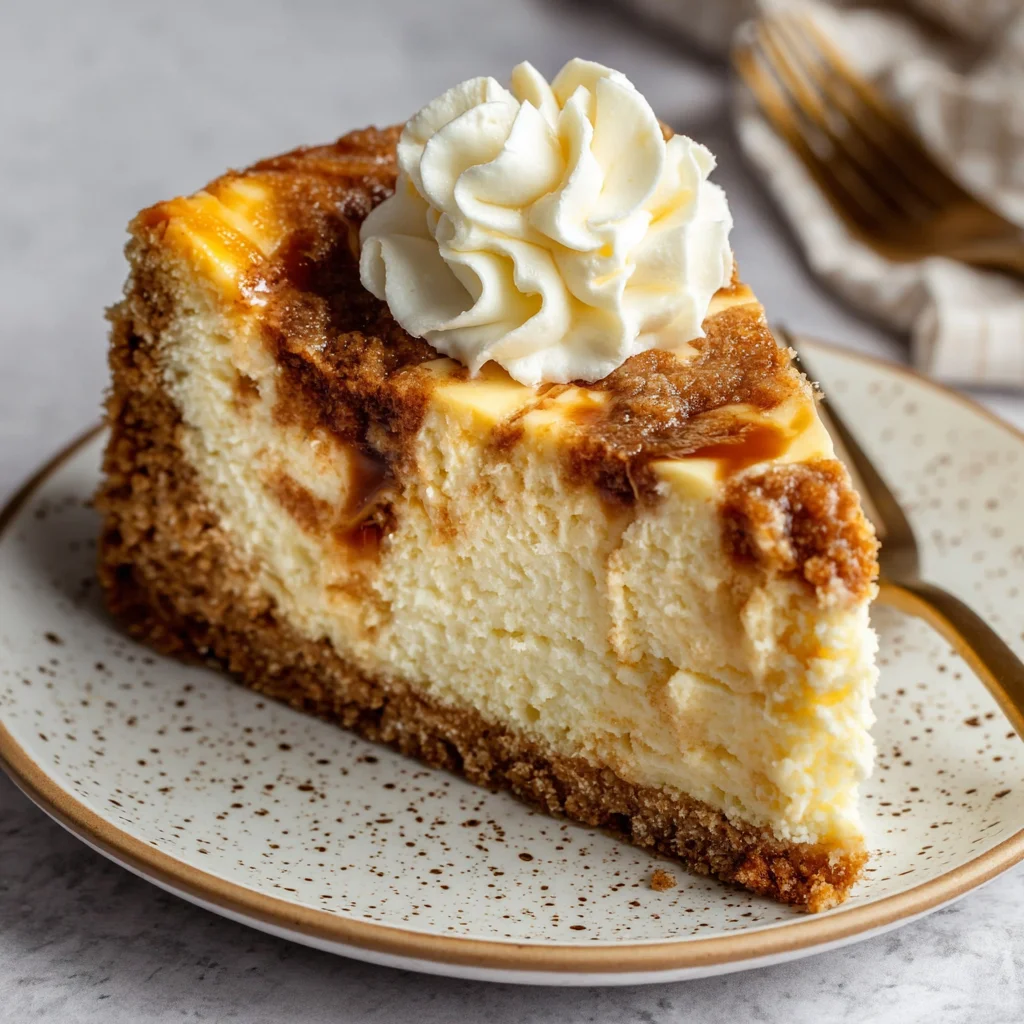
Indulge in the delightful combination of creamy cheesecake and warm snickerdoodle spice with this irresistible Snickerdoodle Cheesecake recipe. This isn’t your average cheesecake; it’s a symphony of textures and flavors that will transport you to dessert heaven. The perfectly crisp, buttery graham cracker crust provides a delightful foundation for the smooth, rich cream cheese filling, infused with the comforting warmth of cinnamon. And the crowning glory? A generous dusting of cinnamon-sugar, that signature snickerdoodle topping, lending a delightful crunch and a hint of sweetness that perfectly complements the creamy base. Prepare to be amazed by this decadent dessert, perfect for any occasion, from casual weeknight treats to elegant dinner parties. This Snickerdoodle Cheesecake recipe promises to be a new family favorite, guaranteed to impress even the most discerning palates. Get ready to embark on a culinary adventure!
Why You’ll Love This Snickerdoodle Cheesecake Recipe
This Snickerdoodle Cheesecake recipe is more than just a dessert; it’s an experience. There’s something truly magical about the combination of classic cheesecake and the comforting spice of snickerdoodles. This recipe offers a unique twist on a beloved dessert, perfectly balancing creamy richness with warm, inviting spice. Here’s why you’ll absolutely adore it:
- Unbeatable Flavor Combination: The creamy, tangy cheesecake perfectly complements the warm cinnamon and sugar of the snickerdoodle topping. It’s a match made in dessert heaven!
- Easy to Make: Despite its impressive presentation, this recipe is surprisingly straightforward. Even novice bakers can achieve delicious results.
- Impressive Presentation: This cheesecake is a showstopper. Its beautiful golden-brown topping and creamy texture make it the perfect centerpiece for any gathering.
- Customizable: Feel free to experiment! Add chocolate chips, pecans, or other nuts to the crust or filling for an extra layer of flavor and texture. Check out more of our dessert recipes for inspiration.
- Perfect for Any Occasion: Whether it’s a birthday, holiday celebration, or a casual weeknight treat, this Snickerdoodle Cheesecake is always a crowd-pleaser.
- Make-Ahead Friendly: Prepare it a day in advance and let the flavors meld – it only gets better with time!
Why You Should Try This Snickerdoodle Cheesecake Recipe
In a world of countless desserts, this Snickerdoodle Cheesecake stands out. It’s not just another cheesecake; it’s a testament to the power of simple, high-quality ingredients and a touch of culinary creativity. The unique blend of flavors and textures creates an unforgettable eating experience. You deserve to treat yourself – and your loved ones – to something truly special. Here are a few more compelling reasons to give this recipe a try:
- Unique and Memorable: This isn’t your grandma’s cheesecake! The snickerdoodle twist adds a delightful layer of unexpected flavor.
- Texture Perfection: The creamy filling, crisp crust, and crunchy topping create a wonderful textural contrast in every bite.
- Shareable Delight: It’s a perfect dessert to share with friends and family, creating lasting memories around a delicious treat.
- Elevated Baking Experience: Challenge yourself to try a new recipe and impress your guests with your culinary skills. Try our other recipes for more inspiration!
- A Perfect Balance of Sweet and Spice: The cinnamon adds a warming touch that perfectly complements the sweetness of the cheesecake. It’s the ideal balance.
- Instagrammable Dessert: This beautiful cheesecake is practically begging to be photographed and shared on social media!
Ingredients and Utensils for Your Snickerdoodle Cheesecake
Gathering the right ingredients and tools is crucial for baking success. This Snickerdoodle Cheesecake requires readily available ingredients, but paying attention to quality will enhance the final product. Let’s dive into the specifics:
Ingredients:
- For the Crust:
- 1 ½ cups (190g) graham cracker crumbs – Use high-quality graham crackers for the best flavor.
- ¼ cup (50g) granulated sugar – Granulated sugar adds sweetness and helps bind the crust.
- 6 tablespoons (3 ounces) unsalted butter, melted – Unsalted butter allows you to control the saltiness of the crust.
- For the Cheesecake Filling:
- 3 (8 ounce) packages cream cheese, softened – Softened cream cheese is essential for a smooth and creamy filling. Let it sit at room temperature for at least an hour before starting.
- 1 ¾ cups (350g) granulated sugar – Adjust the sugar to your preferred sweetness level.
- ¼ cup (60ml) sour cream – Sour cream adds richness and tang to the filling.
- 2 large eggs – Room temperature eggs incorporate better into the batter.
- 1 teaspoon vanilla extract – Pure vanilla extract will give the best flavor.
- ½ teaspoon ground cinnamon – Ground cinnamon brings the warm snickerdoodle flavor to the cheesecake.
- For the Snickerdoodle Topping:
- ¼ cup (50g) granulated sugar – This sugar, combined with cinnamon, creates that iconic snickerdoodle topping.
- 2 tablespoons ground cinnamon – Use freshly ground cinnamon for the strongest flavor.
Necessary Utensils:
- 9-inch springform pan – This type of pan is essential for easily removing the cheesecake.
- Medium bowl – For mixing the crust ingredients.
- Large bowl – For mixing the cheesecake filling.
- Small bowl – For combining the snickerdoodle topping ingredients.
- Electric mixer – A stand mixer or hand mixer will make the process much easier and ensure a smooth cream cheese filling.
- Measuring cups and spoons – Accurate measurements are crucial for baking success.
- Rubber spatula or wooden spoon – For scraping down the sides of the bowls.
- Parchment paper – To line the bottom of the springform pan (optional, but recommended).
- Thin knife – To run around the edges of the pan before removing the sides.
Detailed Steps for Making Your Snickerdoodle Cheesecake
Follow these step-by-step instructions to create your perfect Snickerdoodle Cheesecake. Remember, patience and attention to detail are key to baking success!
Step 1: Prepare the Crust
- Preheat your oven to 350°F (175°C). Lightly grease a 9-inch springform pan. **Tip:** Lining the bottom of the pan with parchment paper will prevent sticking and make removal easier.
- In a medium bowl, combine graham cracker crumbs, sugar, and melted butter. Mix until evenly moistened. **Tip:** Don’t overmix; a slightly crumbly texture is fine.
- Press the mixture firmly into the bottom of the prepared springform pan. **Tip:** Use the bottom of a measuring cup or your fingers to ensure an even crust.
- Bake for 8-10 minutes, or until lightly golden. Let cool completely before adding the filling.
Step 2: Prepare the Cheesecake Filling
- In a large bowl, beat cream cheese and sugar together until smooth and creamy. **Tip:** Make sure your cream cheese is softened to room temperature for a smoother texture. Use an electric mixer for best results.
- Beat in sour cream until well combined.
- Add eggs one at a time, mixing well after each addition. **Tip:** Don’t overmix; just until the eggs are incorporated. Overmixing can lead to cracks in the cheesecake.
- Stir in vanilla extract and cinnamon. **Tip:** A little extra cinnamon never hurts!
Step 3: Assemble and Bake the Snickerdoodle Cheesecake
- Pour the cheesecake filling over the cooled crust.
- In a small bowl, combine granulated sugar and cinnamon. Sprinkle evenly over the cheesecake filling. **Tip:** Use a fine-mesh sieve for an even dusting.
- Bake for 50-60 minutes, or until the cheesecake is set around the edges but the center is still slightly jiggly. **Tip:** The center will firm up as it cools.
- Turn off the oven and leave the cheesecake in the oven with the door slightly ajar for 1 hour. This helps prevent cracking. **Tip:** Use a wooden spoon or a folded kitchen towel to prop the oven door open slightly.
Step 4: Cool and Chill
- Let the cheesecake cool completely in the oven, then refrigerate for at least 4 hours, or preferably overnight, before serving. **Tip:** Patience is key here! The longer it chills, the more firm and flavorful it becomes.
- Run a thin knife around the edge of the pan before removing the sides of the springform pan. **Tip:** A warm, damp cloth around the outside of the pan can help loosen the cheesecake if needed.
Tips and Variations for Your Snickerdoodle Cheesecake
This recipe provides a fantastic base, but feel free to experiment and make it your own! Here are some tips and variations to consider:
- Gluten-Free Crust: Use gluten-free graham cracker crumbs or make your own crust with almond flour, pecans, and melted butter.
- Vegan Option: Substitute vegan cream cheese and eggs (flax eggs or applesauce are good substitutes) for a plant-based version. Experiment with different vegan butter options for the crust.
- Add-Ins: Consider adding chocolate chips, chopped pecans, or walnuts to the crust or filling for extra flavor and texture. A swirl of caramel would also be delicious.
- Spice it Up: Experiment with other warm spices like nutmeg or allspice along with the cinnamon.
- Avoid Cracking: The water bath method (baking the cheesecake in a larger pan filled with hot water) can help prevent cracking. Ensure the cream cheese is softened and don’t overmix the batter.
- Serving Suggestions: Serve with a dollop of whipped cream, a scoop of vanilla ice cream, or a drizzle of caramel sauce.
Nutritional Information and Benefits of Your Snickerdoodle Cheesecake
While this Snickerdoodle Cheesecake is undeniably decadent, let’s look at the nutritional aspects and benefits of its key ingredients:
(Note: The exact nutritional values will vary depending on the specific brands and quantities of ingredients used. This is an approximation.)
Approximate Nutritional Information (per slice):
- Calories: Approximately 450-550
- Fat: Approximately 30-35g
- Protein: Approximately 6-8g
- Carbohydrates: Approximately 50-60g
Ingredient Benefits:
- Cream Cheese: A good source of calcium and protein.
- Graham Crackers: Provide fiber (depending on the brand).
- Cinnamon: Known for its anti-inflammatory properties and potential benefits for blood sugar control.
Remember to enjoy this dessert in moderation as part of a balanced diet. It’s a treat to savor, not a daily staple!
FAQs about Snickerdoodle Cheesecake
Can I freeze Snickerdoodle Cheesecake?
How long does Snickerdoodle Cheesecake last in the refrigerator?
What can I substitute for graham cracker crumbs in the crust?
Can I make this Snickerdoodle Cheesecake ahead of time?
Why is my Snickerdoodle Cheesecake cracking?
Conclusion: Your Snickerdoodle Cheesecake Journey Awaits
This Snickerdoodle Cheesecake recipe is more than just a dessert; it’s a journey of delicious discovery. The perfect blend of creamy cheesecake and warm snickerdoodle spice creates an unforgettable taste experience. We hope this detailed guide has empowered you to create a stunning and delicious Snickerdoodle Cheesecake that will impress your family and friends. Don’t forget to share your baking journey with us! Leave a comment below, share your photos on social media, and tag us! We’d love to see your creations. Happy baking! Pin this recipe for later! And don’t forget to check out other amazing recipes on our blog, like our easy empanadas recipe or our delicious Basque cheesecake for more culinary adventures!

Snickerdoodle Cheesecake
Ingredients
Equipment
Method
- Preheat oven to 350°F (175°C). Grease a 9-inch springform pan.
- Make the crust: Combine graham cracker crumbs, 1/4 cup sugar, and melted butter. Press into the pan and bake for 8-10 minutes, until lightly golden. Cool completely.
- Make the filling: Beat cream cheese and 1 ¾ cups sugar until smooth. Beat in sour cream, then eggs one at a time. Stir in vanilla and cinnamon.
- Pour filling over the cooled crust.
- Make the topping: Combine ¼ cup sugar and 2 tablespoons cinnamon. Sprinkle over the filling.
- Bake for 50-60 minutes, or until the edges are set but the center is slightly jiggly. Turn off the oven and let cool in the oven with the door slightly ajar for 1 hour.
- Cool completely, then refrigerate for at least 4 hours, or preferably overnight.
- Run a knife around the edge before removing the sides of the springform pan.


