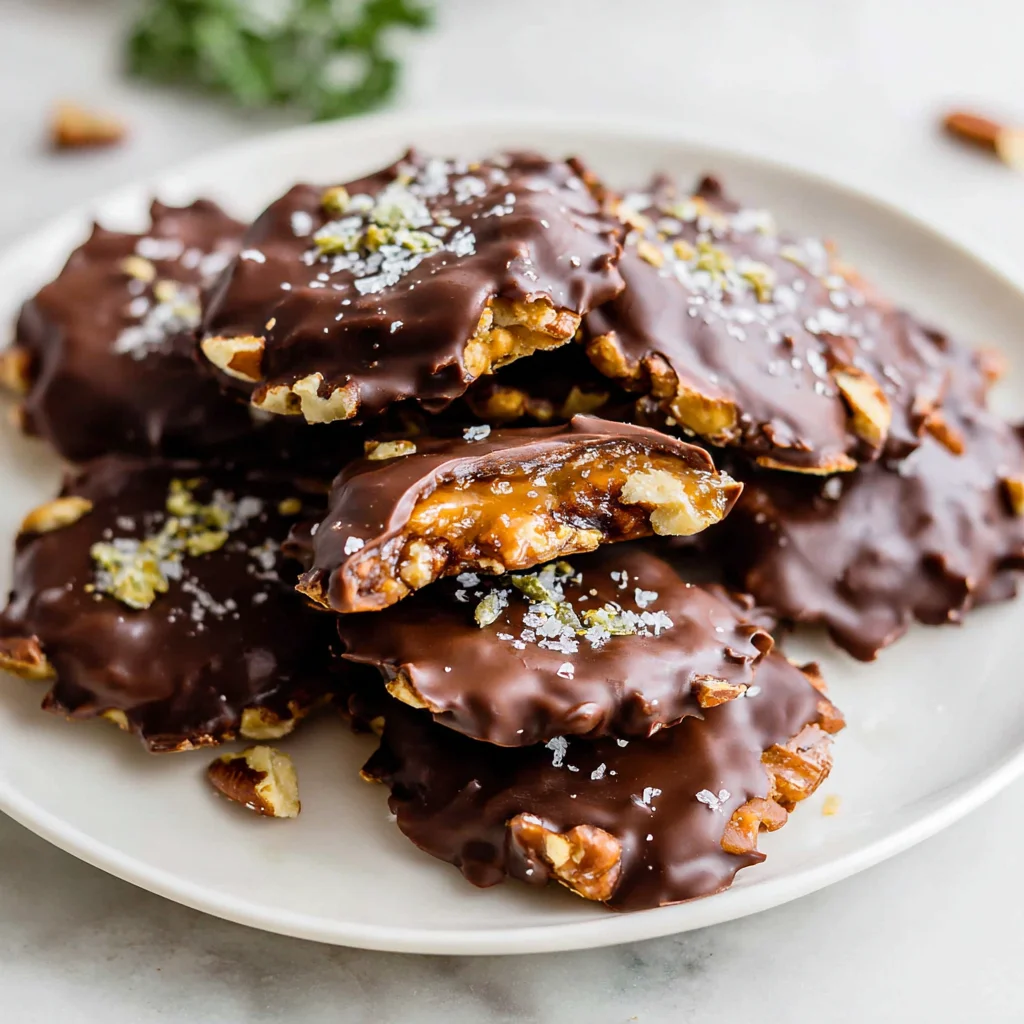
There are few candies that evoke the sense of classic, luxurious indulgence quite like the Turtle. That perfect trifecta crisp, toasted pecans nestled under a gooey, rich caramel blanket, all enrobed in a thick, luxurious layer of melting chocolate is pure dessert magic. Forget those expensive store-bought boxes; learning how to master Homemade Chocolate Turtles is not only surprisingly simple but also infinitely more rewarding. The fresh, deeply toasted flavor of the pecans combined with your own perfectly smooth caramel simply cannot be matched by commercial versions.
This comprehensive guide will walk you through every step, ensuring your candy-making experience is effortless and the results are spectacular. We’re focusing on creating a truly gourmet experience, from selecting the finest ingredients to achieving that professional, glossy chocolate finish. Whether you are preparing a festive platter for the holidays, looking for a personalized gift, or simply craving an exceptional treat, these Homemade Chocolate Turtles are guaranteed to become your new favorite confectionary creation. Let’s dive into the delicious process of creating these iconic pecan caramel clusters right in your own kitchen.
Why You’ll Fall in Love with This Homemade Chocolate Turtles Recipe
When you bite into a freshly made turtle, you immediately understand the hype. This recipe elevates the classic candy, offering compelling reasons why you should choose the homemade route over purchasing pre-made sweets. Making your own batch of Homemade Chocolate Turtles provides a level of quality control and customization that is simply unavailable otherwise, turning a simple treat into a true gourmet experience.
Firstly, the flavor profile is unparalleled. The key difference lies in the toasted pecans. We don’t just use raw pecans; we take the crucial step of toasting them. This process activates the nuts’ essential oils, deepening their flavor and giving them a satisfying, crunchy texture that contrasts beautifully with the soft caramel. Store-bought versions often skip this crucial step, resulting in a duller, less complex flavor. Our emphasis on freshly toasted pecans ensures a superior base for every turtle.
Secondly, you control the caramel consistency. This recipe provides options, whether you use convenient store-bought caramel chews or prefer to make your own from scratch (a variation we’ll discuss later). When using chews and a splash of cream, you melt them down to achieve that perfect, slow-pulling texture gooey enough to be delightful but firm enough to hold the pecan cluster together. This tailored consistency prevents the caramel from oozing excessively, which is a common complaint with overly soft commercial turtles.
Thirdly, the chocolate matters. You choose the caliber of the chocolate and the type that suits your palate best. Do you prefer the rich, slightly bitter notes of dark chocolate turtles, or the sweet, creamy comfort of milk chocolate? By melting high-quality chips (and perhaps a touch of coconut oil for gloss), you ensure a smooth, professional-grade coating that snaps when you bite into it. This recipe is designed for dipping success, even for beginner candy makers.
Finally, there is the sheer joy and pride of presentation. These Homemade Chocolate Turtles are beautiful. Arranged neatly on parchment paper and finished with an optional sprinkle of flaky sea salt which not only looks elegant but also perfectly cuts through the richness they make stunning gifts. Packaging a batch of your own beautifully crafted candy shows thought and effort that a quick trip to the store can never replicate. This recipe is more than just candy; it’s an edible token of affection, perfect for the holidays or a special occasion.
The Joy of Making Your Own: Why You Should Try These Homemade Chocolate Turtles Today
If you have ever hesitated to venture into the world of homemade confections, these Homemade Chocolate Turtles are the perfect entry point. They require minimal specialized equipment and the process is divided into simple, manageable steps, making the entire experience both fun and successful. Trying this recipe offers numerous benefits that extend beyond just satisfying a sweet tooth.
A Cost-Effective Gourmet Treat
Premium candy, especially pecan turtles sold in specialty shops, can be notoriously expensive. By purchasing the raw ingredients pecans, caramel, and chocolate you can produce a large batch of high-quality turtles for a fraction of the cost. This makes the Homemade Chocolate Turtles recipe an incredibly economical choice when you need a quantity of treats for gatherings, office parties, or extensive holiday gifting. You don’t have to compromise on quality to save money; in fact, you’re likely enhancing the quality significantly by making them yourself.
A Perfect Project for All Skill Levels
Unlike complicated French patisserie or delicate sugar work, making these turtles is remarkably straightforward. There are only two main components to worry about: the caramel and the chocolate coating. We use shortcuts, like melting down pre-made caramel chews, to bypass the often tricky process of making kettle caramel from scratch. This means even novice bakers can achieve spectacular results, building confidence in the kitchen. The hands-on assembly, where you lovingly arrange the pecans and dollop the caramel, is meditative and rewarding.
Ultimate Customization for the Perfect Bite
When you make these at home, you are the master of flavor. Do you adore extra-thick chocolate? Dip them twice! Prefer a hint of heat? Infuse your caramel with a pinch of cayenne pepper before coating. Need a low-sugar alternative? Use sugar-free caramel chews and specialized sugar-free chocolate. The ability to tailor every element from the type of nut to the finishing salt ensures that every single Homemade Chocolate Turtle is exactly to your liking. If you enjoy taking classic recipes and making them your own, much like tweaking a classic Spanish dish, perhaps you would enjoy customizing a delicious Homemade Empanada or perfecting your Spanish Omelette (Tortilla Española), both of which offer great creative license in the kitchen.
The freshness factor is perhaps the most compelling reason of all. Pecans, particularly when roasted, are best enjoyed shortly after preparation. When you make these Homemade Chocolate Turtles at home, you guarantee maximum freshness, leading to that superior crunch and nutty flavor that truly sets homemade candy apart. So grab your ingredients and prepare for a rewarding session of candy creation!
Gathering Your Supplies: Ingredients and Essential Utensils (The Building Blocks of Perfect Turtles)
Success in candy making starts with accurate measurements and high-quality ingredients. Because Homemade Chocolate Turtles have so few components, the quality of each ingredient truly shines through. Here is a detailed breakdown of everything you need, along with tips on ingredient selection to ensure optimal flavor and texture.
Premium Ingredients for Gourmet Results
We focus on readily available ingredients that, when combined, create a confection of bakery-quality standard. Remember to always use measuring cups and spoons for precise quantities.
- 1 cup Pecan Halves: Pecan halves are essential for creating the traditional “legs” and structure of the turtle. Look for high-quality, whole pieces that are not broken or dusty. Toasting these properly is the single most important step for developing deep flavor.
- 1 cup Caramel Chews (about 40 pieces) or Pre-Made Caramel Sauce:
- Chews: Brands like Kraft Caramels are reliable, providing a firm, yet chewy consistency when melted with cream. This is the easiest route for beginners.
- Sauce: If using a jarred, pre-made caramel sauce (like an ice cream topping), ensure it is a thicker variety, or you may need to reduce it slightly on the stovetop to prevent the caramel from running off the pecans.
- 2 tablespoons Heavy Cream or Milk (if using caramel chews): This liquid is critical for thinning and smoothing the melted caramel chews. Heavy cream provides the richest texture, but regular milk works perfectly well too. This mixture prevents the caramel from becoming too stiff or hard once it cools.
- 1 cup Milk Chocolate Chips (or Dark Chocolate, depending on preference): The choice of chocolate dictates the final flavor.
- Milk Chocolate: Offers classic sweetness and creaminess.
- Dark Chocolate: Provides a rich counterpoint to the sweet caramel, often preferred by those who find traditional turtles too sugary. A 60-70% cacao content is recommended.
- White Chocolate: Can be used for decorative drizzling, but it’s often too sweet for the primary coating.
Tip: Use high-quality chips or chopping bars (like Ghirardelli or Guittard) rather than inexpensive coating wafers, as the flavor difference is immense.
- 1 teaspoon Coconut Oil or Vegetable Shortening (Optional, for smoother melting): This is your secret weapon for achieving a glossy, smooth chocolate coating without having to deal with the complexities of true tempering. It thins the melted chocolate slightly, allowing excess to drip off easily and creating a beautiful shine.
- Flaky Sea Salt (Optional, for topping): Absolutely recommended! A tiny sprinkle of Maldon or any coarse, flaky sea salt added immediately after dipping provides a beautiful aesthetic touch and a wonderful salty burst that balances the extreme sweetness of the candy.
Kitchen Tools for Seamless Candy Making
You do not need a lot of fancy equipment to make superb Homemade Chocolate Turtles. Here are the essential tools:
- Baking Sheets (x2): You will need one for toasting the pecans and at least one (ideally two large ones) for arranging the turtle bases and setting the finished product.
- Parchment Paper or Silicone Baking Mat: Non-negotiable! Caramel and chocolate are sticky. Lining your baking sheets prevents sticking and makes clean-up a breeze. Silicone mats (like Silpat) are reusable and even better for ensuring no sticking whatsoever.
- Small Saucepan or Microwave-Safe Bowl: For melting the caramel. If using the stovetop, a non-stick pan is best.
- Microwave-Safe Bowl (for chocolate): Preferably glass, as it holds heat well and is easy to stir the chocolate in without scratching.
- Spatulas and Rubber Scrapers: Essential for stirring both the caramel and the chocolate, ensuring even melting and preventing scorching.
- Measuring Cups and Spoons: Accuracy is key for caramel consistency.
- Small Spoon or Cookie Scoop: A small teaspoon or a mini cookie scoop (about 1 teaspoon capacity) is perfect for dolloping the warm caramel precisely onto the pecan clusters.
- Dipping Tools (Forks or Dipping Spoons): Two standard dinner forks work perfectly, allowing the chocolate to drain through the tines. Specialized dipping tools are available but not necessary.
By investing in high-quality ingredients and having these simple tools ready, you ensure that the process of making your Homemade Chocolate Turtles is smooth, efficient, and ultimately delicious. This preparation step sets the stage for a delightful candy-making session!
Detailed Recipe Steps: Crafting Your Homemade Chocolate Turtles
Creating these perfect pecan caramel treats involves four distinct phases: preparing the base, making the gooey caramel, assembling the clusters, and finally, coating them in rich chocolate. Follow these steps carefully for confectionary success.
Step 1: Prepare and Toast the Pecan Bases
The foundation of a great turtle is the flavor and crunch of the pecan.
- Preheat and Arrange: Preheat your oven to 350°F (175°C). Spread the 1 cup of pecan halves in a single layer on an unlined baking sheet.
- Toast for Flavor: Toast the pecans for approximately 5 to 8 minutes. Crucial Tip: Nuts can go from perfectly toasted to burnt quickly. Set a timer and check them around the 5-minute mark. They are done when they release a distinct, fragrant aroma and turn a light golden brown.
- Cool Completely: Remove the pecans from the oven and transfer them immediately to a cool surface (like a clean plate) to stop the cooking process. Allow them to cool completely. Warm pecans can melt the caramel prematurely, so patience is key here.
- Arrange the Bases: Line one or two large baking sheets with parchment paper or a silicone baking mat. Take your toasted pecan halves and arrange clusters of three or four pecans. Spread them slightly outwards to mimic the shape of a turtle’s legs. Leave about 2 inches of space between each cluster to prevent the caramel and chocolate from bleeding together. This forms the essential structure for your Homemade Chocolate Turtles.
Step 2: Achieving Velvety Smooth Caramel
The gooey center is what truly defines a turtle. This recipe uses the shortcut method, but ensures velvety texture.
- Prepare the Chews: If you are using pre-made caramel chews, place the 1 cup of chews and the 2 tablespoons of heavy cream (or milk) into a microwave-safe bowl. (If using pre-made jarred caramel sauce, you can skip this melting process entirely and use the sauce as is, provided it is thick enough.)
- Melt Gradually: Microwave the mixture in short, 30-second bursts. After each interval, stir the mixture thoroughly, ensuring you scrape the bottom and sides of the bowl. Continue this until the caramel is completely smooth, lump-free, and flowing easily. This usually takes 1 to 2 minutes total. Do not overheat the caramel, as it can separate or scorch.
- Cool Slightly: Remove the melted caramel from the heat and let it sit for about 5 minutes. This cooling time is essential; if the caramel is too hot, it will immediately spread out and run off your pecan clusters when applied. It needs to be warm, sticky, and scoopable.
Step 3: Assembly and Chilling the Turtle Shells
Now, we bring the caramel and pecans together.
- Dollop the Caramel: Using a small spoon or a mini cookie scoop, place a generous dollop of the warm, slightly thickened caramel directly over the center of each pecan cluster. The caramel should cover the central intersection, acting as the turtle’s shell and securely binding the pecan legs.
- Shape (if necessary): If your caramel is still slightly runny, let it cool for another minute or two before proceeding. You want the caramel mound to maintain a nice, plump dome shape on top of the pecans.
- Chill to Set: Once all your pecan clusters are topped with caramel, place the baking sheets into the refrigerator. Chill them for approximately 15 to 20 minutes. This chilling step is vital. The caramel must firm up sufficiently before dipping; otherwise, the clusters will fall apart or mush into the melted chocolate.
Step 4 & 5: Mastering the Chocolate Coating and Finishing Touches
The final layer makes these Homemade Chocolate Turtles complete.
- Prepare the Chocolate: Place the 1 cup of chocolate chips and the 1 teaspoon of coconut oil (or shortening, if using) into a microwave-safe bowl.
- Melt Smoothly: Microwave in 30-second intervals, stirring vigorously after each one. Continue until the chocolate is fully melted and completely smooth. The addition of the coconut oil should give it a beautiful, liquid consistency and a natural sheen. Avoid overheating, which causes chocolate to seize and become grainy.
- Dip the Clusters: Remove the chilled caramel pecan clusters from the refrigerator. Using two forks or a specialized dipping tool, gently lower one caramel turtle into the melted chocolate. Submerge it fully, ensuring the entire caramel shell and pecan base are coated.
- Drain Excess: Lift the turtle, pausing momentarily over the bowl to allow any excess chocolate to drip off. A thin, even coating is ideal.
- Final Placement and Salt: Carefully place the newly coated turtle back onto the parchment-lined baking sheet. Immediately, while the chocolate is still wet, sprinkle a tiny pinch of flaky sea salt onto the chocolate shell of each turtle, if desired. For more inspirational ideas on how to finish and present homemade candies, check out our Pinterest board.
- Final Set: Return the baking sheets to the refrigerator for a final chill of 15 to 30 minutes, or until the chocolate coating is completely hard and set to the touch. Once set, your Homemade Chocolate Turtles are ready to be enjoyed!
Tips, Tricks, and Tempting Variations for Your Homemade Chocolate Turtles
While the classic recipe is divine, candy making always benefits from a few tricks of the trade. Here are some solutions to common issues and fun ways to customize your Homemade Chocolate Turtles.
Troubleshooting Common Turtle Mistakes
Even simple recipes can hit snags. Knowing how to fix them ensures a perfect batch every time:
- Runny Caramel: If your caramel is too thin and spreads out immediately upon hitting the pecans, it means it’s either too hot or too thin. Return the caramel to the heat (or microwave) and stir for an extra 30 seconds to allow some moisture to cook off, thickening it slightly. Allow it to cool longer before scooping.
- Seized Chocolate: This happens when chocolate encounters a tiny bit of liquid or is overheated. If your chocolate becomes thick, dull, and grainy, add another teaspoon of coconut oil or shortening and stir vigorously. If the seizure is mild, this can sometimes rescue it. If the seizure is severe, unfortunately, you may need to start with a fresh batch of chocolate. Always ensure your utensils and bowl are completely dry before melting chocolate.
- Turtles Falling Apart During Dipping: This is a sign the caramel was not chilled long enough. The caramel must be firm. If you notice structural issues, pop the sheet back into the freezer for 5–10 minutes before continuing the dipping process.
- Dull Chocolate Finish: A dull finish (blooming) happens when the chocolate sets too slowly or when it’s stored in humid conditions. Using the coconut oil helps, and ensuring a quick, even set in the cold refrigerator helps maintain that desirable glossy sheen.
Creative Variations to Customize Your Candy
Don’t limit yourself to the classic pairing! These variations can make your Homemade Chocolate Turtles unique:
- Nut Substitutions: While pecans are traditional, walnuts, almonds, or even cashews can be substituted. Ensure you toast them properly, adjusting the time slightly depending on the size of the nut.
- Dark Chocolate Sea Salt Turtles: Use high-quality dark chocolate (70% cacao) and definitely don’t skip the flaky sea salt. This creates a sophisticated, less sweet turtle.
- Caramel Flavoring: Add a 1/4 teaspoon of vanilla extract, a pinch of cinnamon, or even a drop of bourbon flavoring (if not microwaving) into your caramel before scooping for an added depth of flavor.
- Vegan Homemade Chocolate Turtles: Use a plant-based caramel sauce (many brands are naturally dairy-free) or vegan caramel chews. Swap the dairy chocolate for high-quality vegan dark chocolate chips. Ensure the coconut oil is used for the coating to maintain smoothness.
- Holiday Drizzle: Once the main coating is set, melt a small amount of contrasting chocolate (white chocolate on dark, or vice versa) and use a fork to drizzle thin lines over the tops of the set turtles for a decorative, professional look.
By keeping these tips in mind, you can effortlessly navigate the candy-making process and confidently experiment with variations, making these Homemade Chocolate Turtles truly your own gourmet creation.
Nutritional Insights: Indulging Wisely
While Homemade Chocolate Turtles are definitively an indulgence, it’s helpful to understand the nutritional components of this decadent treat. As with all homemade candies, moderation is key, but the ingredients themselves offer some surprising benefits, especially compared to highly processed, empty-calorie sweets.
Estimated Nutritional Breakdown (Per Turtle)
Please note that the exact nutritional content will vary greatly depending on the size of your turtles, the type of chocolate used (milk vs. dark), and whether you used cream or milk in the caramel. Below is a general estimate for a medium-sized turtle made with milk chocolate:
| Component | Estimate |
|---|---|
| Calories | Approx. 150 – 200 kcal |
| Total Fat | Approx. 10 – 14 g |
| Saturated Fat | Approx. 5 – 8 g |
| Carbohydrates | Approx. 15 – 20 g |
| Sugar | Approx. 12 – 17 g |
| Protein | Approx. 2 – 3 g |
| Fiber | Approx. 1 g |
The Health Benefits of Pecans and Dark Chocolate
While the overall treat is high in sugar and fats from the caramel and chocolate, the pecan base offers significant nutritional value, making this a better choice than candies composed entirely of refined sugar.
Pecans: A Nutritious Powerhouse
Pecans are packed with nutrients. They are an excellent source of healthy monounsaturated fats, similar to those found in olive oil, which are beneficial for heart health. They also provide a decent amount of fiber, which aids digestion and promotes satiety. Furthermore, pecans are rich in antioxidants, particularly Vitamin E, and important minerals like zinc and magnesium. By toasting them, we enhance their bioavailability and flavor without destroying these essential components.
The Power of Dark Chocolate
If you opt for dark chocolate (70% or higher) for your Homemade Chocolate Turtles, you introduce powerful antioxidants called flavonoids. Studies suggest that dark chocolate, consumed in moderation, can help improve blood flow, lower blood pressure, and protect against cell damage. While milk chocolate offers less of these benefits, using high-quality dark chocolate transforms this treat into a slightly healthier indulgence. For those who prioritize healthy fats and protein, pecans provide a substantial base that makes these turtles far more satisfying than a standard sugary confection.
Remember that enjoying these treats should be about pleasure and balance. A single Homemade Chocolate Turtle makes a rich and satisfying dessert that utilizes nutrient-dense nuts, offering a perfect way to indulge wisely. If you appreciate the balance of deliciousness and relative health benefits in home cooking, you might also be interested in lighter fare such as our recipe for Zucchini Lasagna.
Frequently Asked Questions (FAQs) about Homemade Chocolate Turtles
How do you keep the chocolate glossy on Homemade Chocolate Turtles?
The trick to a glossy finish is using a small amount of coconut oil or vegetable shortening (about 1 teaspoon per cup of chocolate chips) when melting the chocolate. This slight addition thins the chocolate, helping excess drip off cleanly, and aids in rapid, even setting. Additionally, ensuring the turtles chill quickly in the refrigerator helps prevent ‘blooming,’ which causes a dull, grayish appearance.
How long will Homemade Chocolate Turtles last, and how should they be stored?
When stored properly in an airtight container, Homemade Chocolate Turtles will last up to one week at room temperature, or up to two weeks if stored in the refrigerator. If storing in the fridge, allow them to come to room temperature briefly before serving for the best texture. For long-term storage, they can also be frozen for up to three months; just ensure they are well-wrapped to prevent freezer burn.
Can I use crunchy peanut butter instead of caramel for a variation?
Yes, absolutely! Swapping the caramel for a mixture of crunchy peanut butter and melted butter or cream cheese can create a delicious, peanut-butter-pecan cluster. However, peanut butter is much softer than caramel, so you must chill the clusters longer (at least 30 minutes) to ensure the base is firm before attempting to dip them in the chocolate.
Why did my caramel turn hard after cooling?
If your caramel was made from chews and hardened, it likely needed more heavy cream or milk during the melting process. The cream prevents the sugar in the chews from crystallizing and becoming too firm once cool. If using homemade kettle caramel, it means you likely cooked the caramel past the soft-ball stage (240°F) and closer to the firm-ball stage.
Are there gluten-free versions of Homemade Chocolate Turtles?
The classic Homemade Chocolate Turtles recipe is naturally gluten-free, as pecans, caramel chews (most brands), and chocolate chips do not contain wheat. Always double-check the labels of your specific brand of caramel chews and chocolate chips to ensure there are no cross-contamination warnings, especially if preparing for someone with severe gluten sensitivity or celiac disease.
Conclusion: The Sweetest Reward of Homemade Candy
Mastering the art of making Homemade Chocolate Turtles is truly a satisfying culinary achievement. We started with the simple, yet profound step of toasting the pecans to maximize their nutty depth, moved through the careful process of creating the perfect gooey caramel center, and finished by coating each cluster in a beautiful, glossy shell of rich chocolate. These steps, while simple, culminate in a candy that rivals any gourmet confectionary.
This recipe provides flexibility whether you prefer the deep, robust flavor of dark chocolate, the creamy comfort of milk chocolate, or the elegant balance offered by a sprinkle of flaky sea salt you are in complete control. These turtles are not just a delicious treat; they are a delightful kitchen project that yields impressive, gift-worthy results. From a simple snack to a festive offering, the quality of these Homemade Chocolate Turtles will speak for itself, tasting far superior to anything you can buy pre-packaged.
We encourage you to set aside an afternoon and give this recipe a try. The blend of textures the crunch of the pecans, the chew of the caramel, and the snap of the chocolate is what makes this candy an enduring classic. If you enjoyed this venture into classic confectionery, why not explore other comforting, home-style Spanish treats like our famous Churros with Chocolate? Share your success stories and pictures of your beautifully finished Homemade Chocolate Turtles in the comments below! Happy dipping!
Homemade Chocolate Turtles (Salted Caramel Pecan Candy)
Ingredients
Equipment
Method
- Preheat your oven to 350°F (175°C). Spread the pecan halves in a single layer on a baking sheet. Toast for about 5 to 8 minutes, watching carefully until they are lightly fragrant.
- Remove the pecans and allow them to cool completely. Line one or two large baking sheets with parchment paper or a silicone baking mat.
- Arrange clusters of three or four toasted pecan halves on the prepared baking sheets, spreading them slightly outwards to resemble the legs of a turtle. Leave about 2 inches of space between each cluster.
- (If using caramel chews): Place the caramel chews and the heavy cream into a microwave-safe bowl. Microwave the mixture in 30-second intervals, stirring thoroughly after each interval, until the caramel is completely smooth and melted. Alternatively, melt in a small saucepan over low heat.
- Remove the caramel from the heat and allow it to cool slightly (about 5 minutes) so it is thick enough to hold its shape but still pliable.
- Using a small spoon or a cookie scoop (about 1 teaspoon size), place a dollop of the warm caramel directly over the center of each pecan cluster. The caramel should sit on top of the pecans, forming the turtle's 'shell.'
- Place the baking sheets into the refrigerator for 15 to 20 minutes, or until the caramel has firmed up slightly and is tacky to the touch.
- Place the chocolate chips and the coconut oil (if using) into a microwave-safe bowl. Microwave in 30-second intervals, stirring well after each one, until the chocolate is fully melted and smooth. Do not overheat.
- Take the chilled caramel pecan clusters out of the refrigerator. Dip each caramel turtle into the melted chocolate, ensuring the caramel and pecans are fully covered. Use two forks to gently lift and allow the excess chocolate to drip off.
- Carefully place the fully coated turtle back onto the parchment-lined baking sheet. Immediately sprinkle a tiny pinch of flaky sea salt onto the wet chocolate shell (if desired).
- Return the baking sheets to the refrigerator for another 15 to 30 minutes, or until the chocolate is completely set and hardened before serving.


