Are you ready to embark on a culinary adventure that will tantalize your taste buds and impress your guests? Then look no further! This recipe for a Delicious Fruit Tart is the perfect blend of simple elegance and exquisite flavor. Imagine a crisp, buttery shortbread crust cradling a smooth, creamy custard, all adorned with a vibrant array of fresh, juicy fruits. This isn’t just a dessert; it’s a masterpiece. From the initial crumble of the digestive biscuits to the final flourish of glistening fruit, every step is designed to deliver an unforgettable sensory experience. This isn’t your grandma’s fruit tart; it’s a modern interpretation of a classic, perfect for any occasion, from a casual weeknight treat to a sophisticated dinner party dessert. Whether you’re a seasoned baker or a kitchen novice, this recipe is designed to guide you through the process with ease and confidence, ensuring a stunning and delicious result. Prepare to be amazed by how simple it is to create something truly extraordinary.
Why You’ll Love This Delicious Fruit Tart Recipe
This Delicious Fruit Tart recipe is more than just a dessert; it’s an experience. What truly sets it apart is its versatility and ease of preparation. The shortbread crust is incredibly simple to make, requiring only two ingredients – digestive biscuits and melted butter. This is a great recipe for beginners and seasoned bakers! The creamy custard filling, rich and smooth, provides the perfect contrast to the crisp crust and the sweet, juicy fruit. It’s a delightful dance of textures and flavors that will leave you wanting more. But the true magic lies in its adaptability. The beauty of this tart lies in its customizability. Feel free to experiment with different fruits – the possibilities are endless! From classic strawberries and raspberries to more exotic options like mango, passion fruit, or even figs, you can tailor this tart to your preferences and the season’s freshest offerings. It’s also a fantastic way to use up leftover fruit, turning potentially wasted produce into a stunning centerpiece for your next gathering. The best part? You can prepare the crust and custard ahead of time, making this a perfect make-ahead dessert, ideal for busy schedules and stress-free entertaining. Finally, the presentation is simply captivating. This tart is visually stunning, making it a perfect choice for any special occasion or simply to brighten up your day.
Why You Should Try This Delicious Fruit Tart Recipe
Beyond the sheer deliciousness, there are several compelling reasons why you should definitely give this Delicious Fruit Tart recipe a try. Firstly, it’s incredibly adaptable to your skill level and preferences. Whether you’re a seasoned pastry chef or a beginner baker, the straightforward instructions and manageable steps will guide you to success. This is especially valuable if you’re looking to impress friends and family without spending hours in the kitchen. Secondly, this recipe champions seasonal ingredients, encouraging you to utilize fresh, local produce and appreciate the natural flavors of the fruits you choose. This not only enhances the taste of the tart but also contributes to sustainable eating practices. Thirdly, the process itself is incredibly rewarding. From the satisfying crumble of the biscuits to the smooth, velvety texture of the custard, each stage of creation is enjoyable and engaging. It’s a delightful culinary journey that will leave you feeling accomplished and proud of your delicious creation. And lastly, the beauty of this tart is undeniable. Its vibrant colors and elegant presentation make it a showstopper dessert, perfect for birthdays, holidays, or simply a special treat for yourself or your loved ones. So, why wait? Give this delicious fruit tart recipe a go; it’s an experience that will exceed your expectations.
Ingredients and Necessary Utensils for Your Delicious Fruit Tart
Creating a truly stunning and delicious fruit tart involves selecting high-quality ingredients and employing the right tools. Here’s a detailed breakdown to ensure your baking journey is seamless and successful. Let’s dive into the specifics:
Ingredients: A Symphony of Flavors
- For the Crust:
- 200g Digestive Biscuits (or similar buttery biscuits): These provide the perfect base for a crumbly and flavorful crust. Look for biscuits that are rich and buttery for optimal taste. You can experiment with different biscuit types; graham crackers work well as a substitute.
- 100g Melted Unsalted Butter: The butter adds richness and binds the biscuit crumbs together, creating a cohesive and flavorful crust. Ensure the butter is completely melted for even distribution and a smooth texture.
- For the Custard:
- 500ml Whole Milk: Whole milk adds richness and creaminess to the custard, enhancing its overall texture and flavor. You can experiment with slightly less or more milk depending on the desired consistency of your custard.
- 100g Granulated Sugar: The sugar balances the tartness of the fruit and contributes to the custard’s delicate sweetness. Caster sugar can also be used as an alternative.
- 4 Large Egg Yolks: The egg yolks are crucial for thickening and enriching the custard, creating a luxurious and smooth texture. Make sure your eggs are fresh for best results.
- 40g Cornstarch (or Arrowroot Powder): The cornstarch or arrowroot powder acts as a thickening agent, ensuring the custard reaches the desired consistency. Cornstarch provides a slightly smoother custard while arrowroot offers a clearer result.
- 1 Teaspoon Vanilla Extract: A touch of vanilla extract enhances the overall flavor profile of the custard, adding warmth and depth. Other extracts like almond or lemon can be used for a different flavor profile.
- For the Decoration:
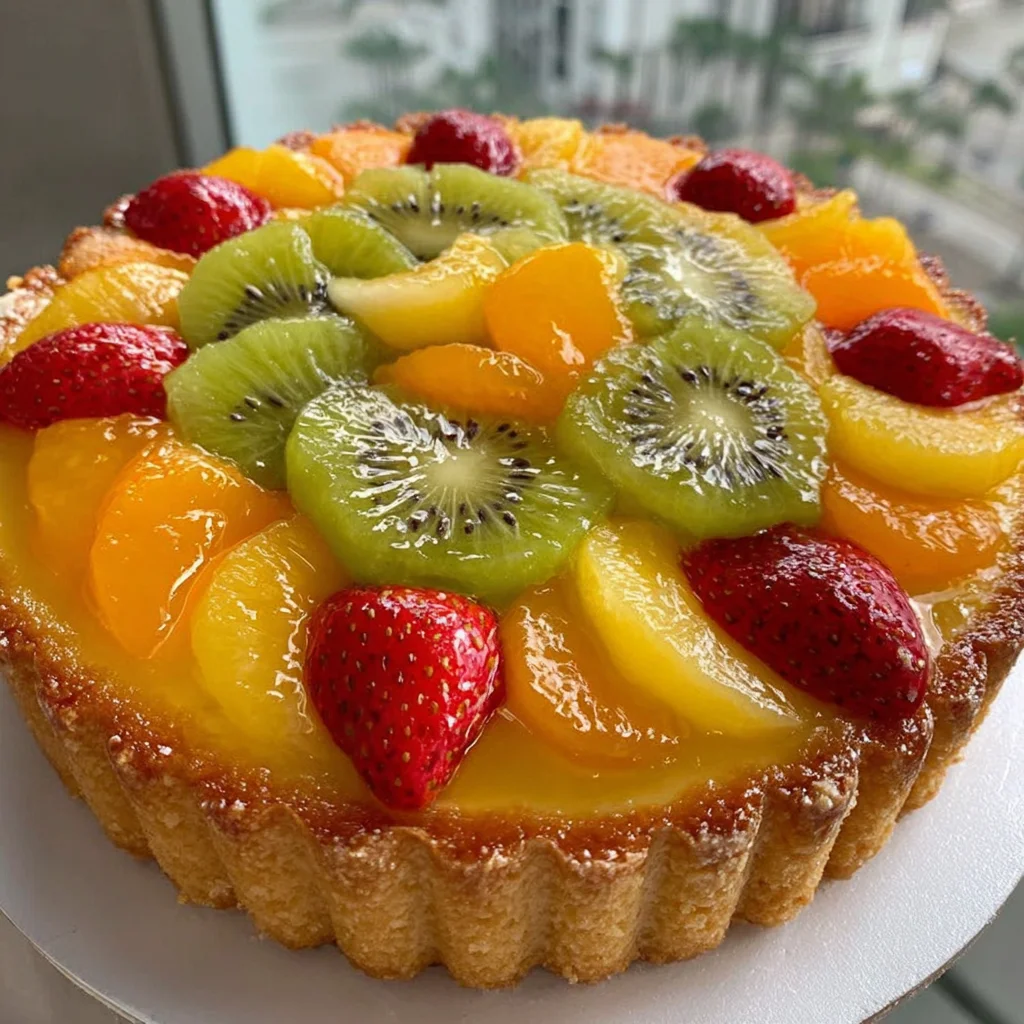
- 500g Assorted Fresh Fruit: The star of the show! Choose a variety of your favorite fruits for a visually appealing and flavorful experience. Strawberries, raspberries, blueberries, kiwi, and mandarin segments are excellent choices. Consider seasonal fruits for optimal taste and freshness.
- Apricot Jam (Optional): A thin layer of apricot jam can be brushed over the fruit to add a beautiful shine and help preserve its color and freshness. Other fruit preserves like clear jelly work as alternatives.
Necessary Utensils: Tools for Baking Success
- Food Processor or Plastic Bag for Crushing Biscuits: A food processor provides a quick and efficient method for crushing the digestive biscuits. Alternatively, you can place the biscuits in a strong plastic bag and crush them with a rolling pin.
- 24cm Diameter Springform Pan: This type of pan allows for easy removal of the tart once it’s cooled and set, ensuring a clean and presentable result. Ensure your springform pan is properly greased and lined.
- Measuring Cups and Spoons: Accurate measurements are essential for achieving the perfect custard consistency. Use reliable measuring tools to ensure consistent results.
- Whisk: A whisk is crucial for smoothly incorporating the ingredients for the custard and ensuring there are no lumps. Choose a sturdy whisk that’s comfortable to use.
- Saucepan: A medium-sized saucepan is essential for cooking the custard gently over medium-low heat. Use a heavy-bottomed saucepan for even heat distribution.
- Rubber Spatula or Wooden Spoon: A rubber spatula or wooden spoon is perfect for scraping down the sides of the pan as you cook the custard, preventing burning and ensuring even cooking.
- Bowl: You will need a large bowl for whipping the egg yolks and sugar and a separate bowl for cooling the custard.
- Plastic Wrap: Using plastic wrap directly on the surface of the custard prevents a skin from forming while it cools.
- Knife and Cutting Board: For preparing the fruit, a sharp knife and clean cutting board are necessary for clean cuts and safe food preparation.
- Pastry Brush (Optional): If you are using apricot jam or other glaze, a pastry brush is useful for applying the glaze evenly over the fruit.
Detailed Recipe Steps for Your Delicious Fruit Tart
Let’s embark on the creation of your magnificent Delicious Fruit Tart. Follow these steps carefully for optimal results. Remember, patience and attention to detail are key to baking success:
Step 1: Prepare the Crust
Begin by crushing the digestive biscuits. Use a food processor for a quick and even crumb, or place them in a sturdy plastic bag and crush them with a rolling pin until they resemble fine breadcrumbs. Combine the crushed biscuits with the melted unsalted butter in a large bowl. Mix thoroughly until the mixture is evenly moistened and forms a cohesive mass that holds its shape when pressed.
Step 2: Form the Base
Press the biscuit mixture firmly into the bottom of your 24cm springform pan. Ensure the base is evenly distributed and compact. Use the bottom of a measuring cup or your fingers to create an even layer. For a neater finish, you can use the back of a spoon to create a slightly sloped edge. Refrigerate the crust for at least 30 minutes to firm up before adding the custard. This prevents the base from becoming soggy.
Step 3: Prepare the Custard
In a saucepan, combine the milk and half the sugar (50g). Heat gently over medium heat until the sugar dissolves completely and the milk is warm but not boiling. In a separate bowl, whisk together the egg yolks and the remaining sugar (50g) until the mixture is pale and frothy. This is crucial for creating a smooth and light custard.
Step 4: Combine and Cook
Gradually whisk the warm milk into the egg yolk mixture, a little at a time. This prevents the eggs from scrambling. Whisk in the cornstarch to ensure it’s fully incorporated and prevent lumps. Pour the mixture back into the saucepan. Cook over medium-low heat, stirring continuously with a wooden spoon or rubber spatula, ensuring you scrape the bottom and sides of the pan to prevent burning. Continue to stir until the custard thickens and comes to a gentle boil. This usually takes about 2-3 minutes. **Remove from heat immediately and stir in the vanilla extract.**
Step 5: Cool the Custard
Pour the hot custard into a clean bowl. Cover the surface of the custard with plastic wrap, pressing it directly onto the custard to prevent a skin from forming. Allow the custard to cool completely at room temperature before using it to fill the tart. This is crucial for the custard to set properly and prevent a watery texture. You can speed up the cooling process by placing the bowl in an ice bath.
Step 6: Assemble the Tart
Once the custard has cooled completely, spread it evenly over the chilled biscuit crust. Ensure there’s a nice and consistent layer. Now for the fun part! Wash and prepare your assortment of fresh fruits. Slice, dice, or arrange the fruits as you like, creating a visually appealing design on top of the custard. For an extra touch of elegance, gently brush the fruit with apricot jam for a glossy finish, which will also preserve the fruit’s color and prevent discoloration.
Step 7: Chill and Serve
Refrigerate the completed tart for at least 30 minutes (or longer for a firmer custard) to allow the flavors to meld and the fruit to chill. This step is crucial for letting the custard fully set and preventing a messy, runny tart. Once chilled, carefully remove the tart from the springform pan and serve. Enjoy your delicious creation!
Tips and Variations for Your Delicious Fruit Tart
To elevate your Delicious Fruit Tart, consider these tips and variations:
- Fruit Selection: Experiment with different fruit combinations. Seasonal fruits will always offer the best flavor. Consider using a mix of colors and textures for visual appeal.
- Crust Variations: For a gluten-free version, use gluten-free digestive biscuits or make a crust with almond flour and melted butter. A pecan or almond crust adds a delightful crunch and nutty flavor.
- Custard Enhancements: Add a tablespoon of lemon zest to the custard for a bright, citrusy flavor. A splash of orange liqueur like Grand Marnier adds a sophisticated twist.
- Vegan Option: Substitute the eggs with a flax egg (1 tablespoon flaxseed meal mixed with 3 tablespoons water) for a vegan custard. Use vegan butter for the crust.
- Garnish: Add a sprinkle of powdered sugar or a dusting of cocoa powder for a final touch of elegance.
- Make-Ahead Tip: You can prepare the crust and custard a day ahead of time, making assembly quicker and easier for your next gathering.
- Avoid Soggy Crust: Ensure the crust is completely chilled before adding the custard. Don’t overfill the tart; a thin layer of custard is best to prevent a soggy bottom.
Nutritional Values and Benefits of Your Delicious Fruit Tart
While this Delicious Fruit Tart is undeniably indulgent, it also offers nutritional benefits thanks to its wholesome ingredients. The precise nutritional information will vary depending on the specific fruits used, but here’s a general overview:
- Digestive Biscuits: Provide some fiber, although they are also a source of carbohydrates and some fats.
- Butter: A source of fat, contributing to the richness and texture of the crust.
- Milk: Provides calcium and protein.
- Eggs: Excellent source of protein and essential nutrients.
- Fruit: A powerhouse of vitamins, minerals, antioxidants, and fiber, varying depending on your selection. Strawberries are rich in vitamin C, while blueberries are packed with antioxidants. Raspberries provide fiber.
The overall caloric content will depend on the type and quantity of fruit used, but it’s important to remember that moderation is key. Enjoy this delightful dessert in smaller portions as part of a balanced diet.
FAQs
How long can I store my Delicious Fruit Tart?
Can I freeze my Delicious Fruit Tart?
What are some other fruits I can use in this Delicious Fruit Tart?
Can I make the crust ahead of time?
How do I prevent a soggy bottom on my Delicious Fruit Tart?
Conclusion: Indulge in Your Delicious Fruit Tart
Creating this Delicious Fruit Tart is a journey of simple pleasures. From the satisfying crumble of the biscuits to the vibrant arrangement of fresh fruits, the process is as delightful as the final result. Remember, the key to a truly outstanding tart lies in the quality of the ingredients and the attention you give to each step. Don’t be afraid to experiment with different fruits and flavors let your creativity shine! This recipe offers a delightful blend of ease and elegance, making it perfect for any occasion. So, gather your ingredients, put on your apron, and let’s bake! Share your creation with us – we’d love to see your stunning fruit tarts! Don’t forget to share this recipe with your friends and family – let them experience the joy of this delicious dessert too! For more delicious recipes, check out our other posts on Noeliarecipes.com, including our fantastic Empanada recipe!
For more baking inspiration, check out my Pinterest board: Noeliarecipesblog Pinterest
Tarta de Fruta Deliciosa
Ingredientes
Equipment
Method
- Tritura las galletas hasta obtener una textura arenosa. Mezcla con la mantequilla derretida hasta formar una masa homogénea.
- Presiona la masa en el fondo del molde, cubriendo uniformemente y compacta. Reserva en la nevera.
- Calienta la leche con la mitad del azúcar en un cazo. Bate las yemas con el azúcar restante hasta que estén espumosas.
- Añade la maicena a las yemas y mezcla. Vierte poco a poco la leche caliente sobre la mezcla, removiendo constantemente.
- Vuelve a verter la mezcla en el cazo y cocina a fuego medio-bajo, removiendo hasta que espese. Retira del fuego e incorpora la vainilla.
- Vierte la crema en un bol, cubre con film y deja enfriar completamente.
- Extiende la crema sobre la base de galleta. Decora con la fruta, creando un diseño atractivo. Pincela con mermelada (opcional).
- Refrigera la tarta durante al menos 30 minutos antes de servir.